
This post follows on from my exploration of the Espressif esp-matter Light_Switch sample, which I tried to setup on iOS home. You can read that post here and I recommend you do
The Objective
My goal is to add Dimming control into the Light Switch, but I want to use the same button.
I want the click to turn the light on and off, so I need another way to adjust the Light level.
I’ve seen solutions to this in various forms, where you can dim with only one button. I think the first time I saw this was in an IKEA LED strip light I got years ago. Clicking the button turned it on and off, but holding the button down cycled through the rainbow of colours.
I figure I can adopt the same interaction for dimming. Click to turn the light on & off. Hold the button down to adjust brightness, reversing direction with each long press.
The current Light Switch example makes uses of espressif’s ESP-IoT-Solution. This is, from what I understand, a set of libraries that provide APIs for specific tasks. In our case, it’s a Button. You can read more here – https://docs.espressif.com/projects/esp-iot-solution/en/latest/input_device/button.html
The library offers lots of different events, but I’m interested the Event called LONG_PRESS_HOLD.

Each time I get a BUTTON_LONG_PRESS_HOLD I will adjust the brightness level in a specific direction (up or down). When I get BUTTON_LONG_PRESS_UP, I’ll switch the direction, so the next press goes in reverse.
Getting Started
I started by making a copy of the esp-matter Light Switch example into my own directory
cp -a ~/esp/esp-matter/examples/light_switch/. ~/matter-esp32-touch-on-off-switch/To make sure it’s all okay, set the target and compile it. I’m using my ESP32-H2 as before.
idf.py set-target esp32-h2
idf.py build
I’m using the same esp32-h2 I used in the previous post. This means it’s already past of my Thread network and under the control of my chip-tool. I can flash the new code, without needing to re-commission it!
Code
If we look at the existing code in the Light Switch sample, we can see how the IoT-Button library is used.
app_driver_handle_t app_driver_switch_init()
{
  button_handle_t btns[BSP_BUTTON_NUM];
  ESP_ERROR_CHECK(bsp_iot_button_create(btns, NULL, BSP_BUTTON_NUM));
  ESP_ERROR_CHECK(iot_button_register_cb(btns[0], BUTTON_PRESS_DOWN, app_driver_button_toggle_cb, NULL));
The code registers a callback for the BUTTON_PRESS_DOWN event.
Looking at this event sequence of the events, I see two problems
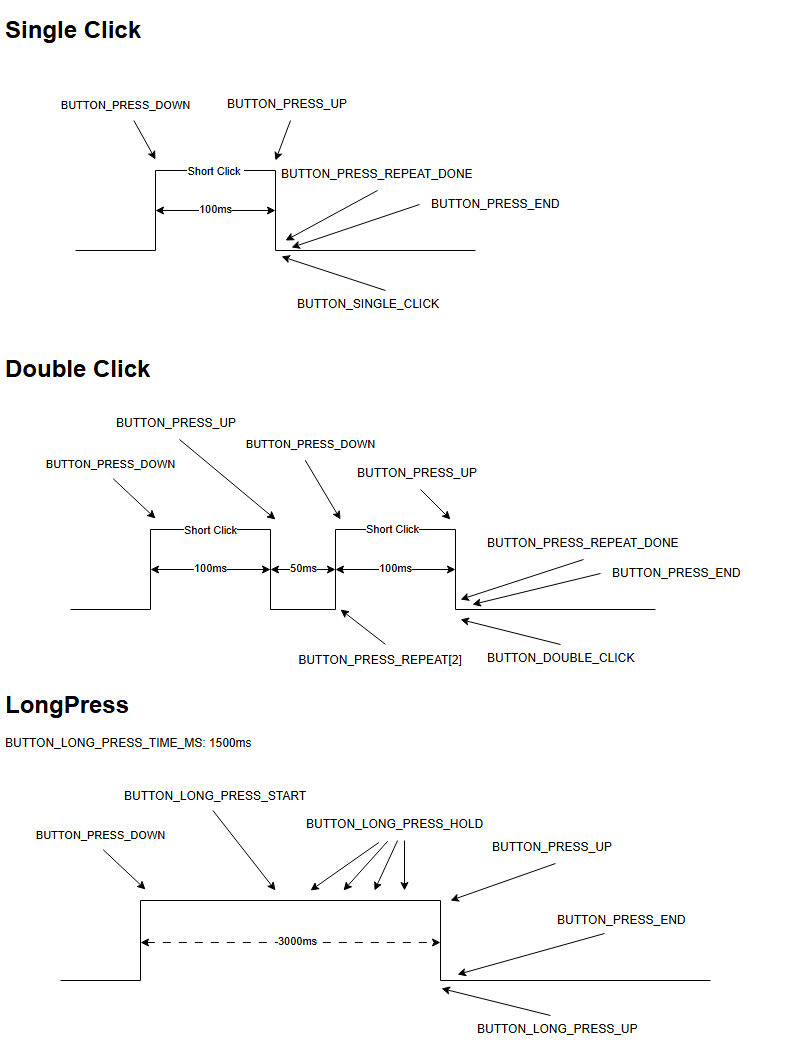
First, the BUTTON_PRESS_DOWN event is raised for Single, Double and Long Press. Second, the BUTTON_PRESS_UP is raised when the button is released. This makes it tricky to tell the difference between the two.
Thankfully, espressif provide the mechanism and they do it as part of their Generic_Switch example! The key is this check iot_button_get_ticks_time, which is in their example:
if (iot_button_get_ticks_time((button_handle_t)arg) < 5000) {It checks how long the button has been pressed. If less than 5 seconds, in this example, it’s a long press.
This was enough to get me started! First, I changed the event for the toggle_cb, moving from BUTTON_PRESS_DOWN to BUTTON_PRESS_UP.
ESP_ERROR_CHECK(iot_button_register_cb(btns[0], BUTTON_PRESS_UP, app_driver_button_toggle_cb, NULL));Next, I add the time check to the callback.
static void app_driver_button_toggle_cb(void *arg, void *data)
{
if (iot_button_get_ticks_time((button_handle_t)arg) < 5000) {
ESP_LOGI(TAG, "Single Click");
client::request_handle_t req_handle;
req_handle.type = esp_matter::client::INVOKE_CMD;
req_handle.command_path.mClusterId = OnOff::Id;
req_handle.command_path.mCommandId = OnOff::Commands::Toggle::Id;
lock::chip_stack_lock(portMAX_DELAY);
client::cluster_update(switch_endpoint_id, &req_handle);
lock::chip_stack_unlock();
} else {
ESP_LOGI(TAG, "Long Press");
// TOOD Reverse the current dimming direction
}
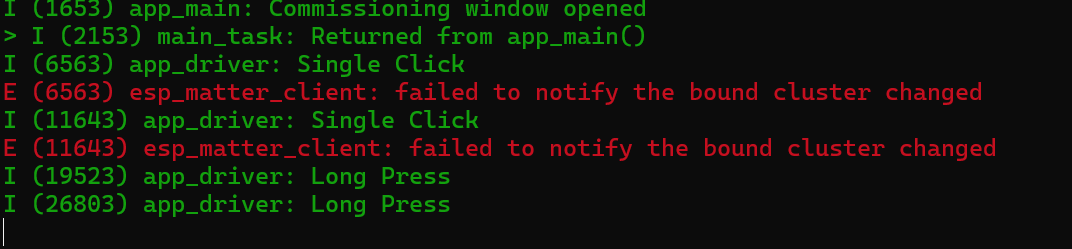
}Clicking the BOOT button once on the ESP32-H2

I held it down for 5 seconds, didn’t exactly get the outcome I wanted!!

You can see my “Long Press” logging message, but it only went and triggered a bloody factor reset!!!!
I think this line, in app_main is responsible for adding this reset behaviour.
app_reset_button_register(switch_handle);Good to know it’s there, but I’ll comment this out for my testing.
I won’t bother pairing the device at this stage, since we don’t actually need it communicating. After flashing, I get closer to the desired behaviour.
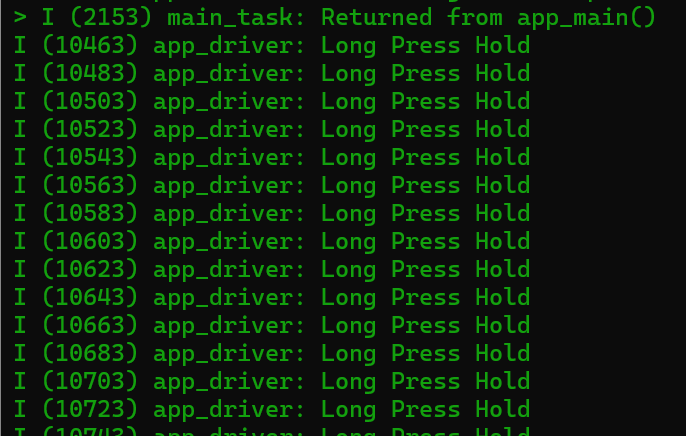
With Long Press working, it’s time to listen for BUTTON_LONG_PRESS_HOLD. I’m expecting this to be triggered repeatedly.
static void app_driver_button_dimming_cb(void *arg, void *data)
{
    ESP_LOGI(TAG, "Long Press Hold");
}

...

ESP_ERROR_CHECK(iot_button_register_cb(btns[0], BUTTON_LONG_PRESS_HOLD, app_driver_button_dimming_cb, NULL));
Bingo; holding the button down resulted in a stream of BUTTON_LONG_PRESS_HOLD events.
Changing the Light Level
I now know the level should be changing, but I translate that into Matter code. Espressif don’t seem to offer a Dimmer example, so I went looking at the Matter specification.
Section 6.2 of the Matter Device Library deals with Dimmer Switches.
Under the Cluster Requirements I found this

On/Off controls if the Light is on or off and Level Control must be used for dimming.
In the Light_Switch sample, the On/Off is toggled like this:
client::request_handle_t req_handle;
req_handle.type = esp_matter::client::INVOKE_CMD;
req_handle.command_path.mClusterId = OnOff::Id;
req_handle.command_path.mCommandId = OnOff::Commands::Toggle::Id;

lock::chip_stack_lock(portMAX_DELAY);
client::cluster_update(switch_endpoint_id, &req_handle);
lock::chip_stack_unlock();
So there should be a corresponding command to manage the Level Control. I ran a search through the esp-matter directory and found this in the connectedhomeip examples. These examples are from the Matter project, so aren’t necessarily ESP specific.
I found this line in a method called “SwitchChangeBrightness”
data->CommandId = Clusters::LevelControl::Commands::MoveToLevel::Id;After a lot of googling, translated that into similar code:
LevelControl::Commands::MoveToLevel::Type moveToLevelCommand;
moveToLevelCommand.level = 127;
moveToLevelCommand.transitionTime.SetNonNull(0);
moveToLevelCommand.optionsMask = static_cast<chip::BitMask<chip::app::Clusters::LevelControl::LevelControlOptions>>(0U);
moveToLevelCommand.optionsOverride = static_cast<chip::BitMask<chip::app::Clusters::LevelControl::LevelControlOptions>>(0U);

client::request_handle_t req_handle;
req_handle.type = esp_matter::client::INVOKE_CMD;
req_handle.command_path.mClusterId = LevelControl::Id;
req_handle.command_path.mCommandId = LevelControl::Commands::MoveToLevel::Id;
req_handle.request_data = &moveToLevelCommand;
Basically, this this creates a MoveToLevel command and sets is as the request_data to the request. It should move the level to 50% (max is 254)
Does this work?? No 🤣
I can see the logging in the Light that shows the ON/OFF being received, but nothing happened!
What about the using the chip-tool? We can send commands from that.
chip-tool levelcontrol move-to-level 254 0 0 0 0x56 0x01This should set the level to 100% on Node 0x56 (our light). This worked.

This put the problem back in my code (of course!)
Why does the MoveToLevel command not work?
I did some googling and happened up a Home Assistant community post. The answer was related to the ACL and it hit me. I was only granting permission for Cluster 0x06 (On/Off), but level control is Cluster 0x08.
I needed to add a binding for the Level Control cluster too! As the write command is absolute i.e. it overwrites the binding table completely, I specified both bindings. One for cluster 6 and one for cluster 8.
chip-tool binding write binding '[{"node":86, "endpoint":1, "cluster":6},{"node":86, "endpoint":1, "cluster":8}]' 0x54Sadly, this got rejected

I scratched my head and then I remembered that the LevelControl was part of the Dimmer Switch Device Type. Was I even using the right device type??
No! I was using the plain old On Off Switch!
on_off_switch::config_t switch_config;
endpoint_t *endpoint = on_off_switch::create(node, &switch_config, ENDPOINT_FLAG_NONE, switch_handle);
ABORT_APP_ON_FAILURE(endpoint != nullptr, ESP_LOGE(TAG, "Failed to create on off switch endpoint"));
I changed this to dimmer_switch:
dimmer_switch::config_t switch_config;
endpoint_t *endpoint = dimmer_switch::create(node, &switch_config, ENDPOINT_FLAG_NONE, switch_handle);
I flashed this one the ESP32-H2 and tried to add the two bindings again….
Success!!!
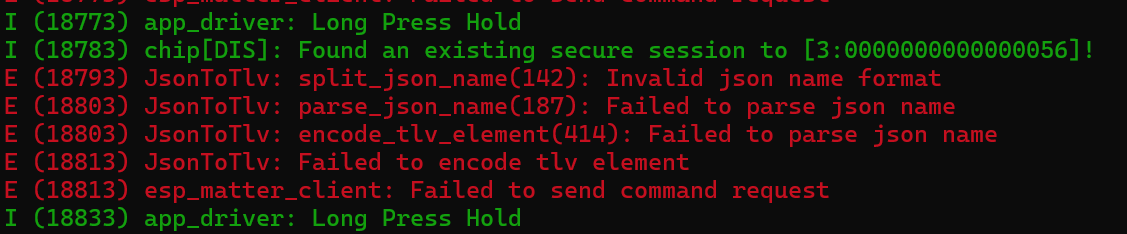
When I click the button, the light toggles, but the LongPress results in an error
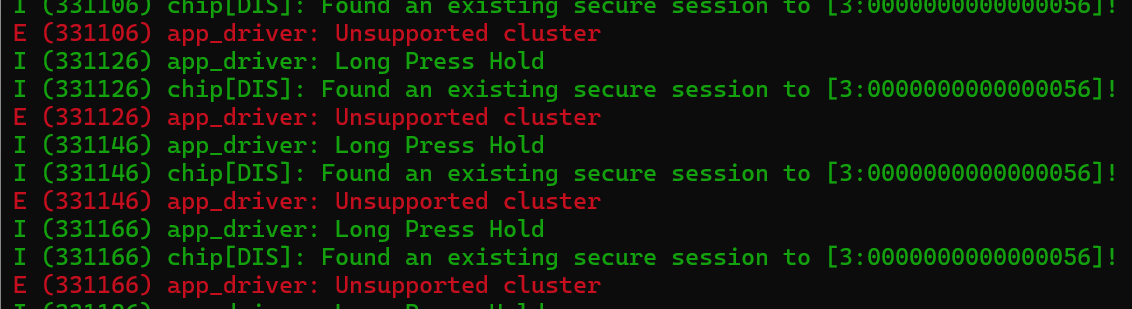
What’s interesting is this line:
I (422766) chip[DIS]: Found an existing secure session to [3:0000000000000056]!This must be the connection to the Light as it has a node Id of 0x56! This is progress of sorts.
Since the error “Unsupported Cluster” had app_driver as its TAG, the error was local to my code. A quick search showed the “Unsupported cluster” error was present in both the app_driver_client_invoke_command_callback and app_driver_client_group_invoke_command_callback functions.
Looking through this, it was obvious these functions were responsible for essentially building up the command. The MoveToLevel command wasn’t support here, so we got the “Unsupported cluster” error. I added an else if to support it, copying the one for the OnOff
 else if (req_handle->command_path.mClusterId == LevelControl::Id)
 {
    strcpy(command_data_str, "{}");
 }
This seems to remove the error

On the Light side, the command is *finally* received!

Moving to the Level we want
With the command now being sent and received, the next step is putting in the parameters. At this time, I’m sending an empty JSON string, which isn’t much use.
On this page https://docs.espressif.com/projects/esp-matter/en/latest/esp32/developing.html#matter-controller, I found a snipped of JSON that looked like it might do the trick.

I put that into my code, changing the level:
strcpy(command_data_str, "{\"level\": 128, \"transitionTime\": 0, \"optionsMask\": 0, \"optionsOverride\": 0 }");Yikes. It didn’t like that
From the messages, it seems we need to use a TLV encoding *in* the JSON. Never seen that before.
After a lot of reading, I actually just ended up back where I started!! Looking at the full example from esp-matter page, shows this:

It actually showed how to convert from the readable JSON into TLV. There was also a massive note.
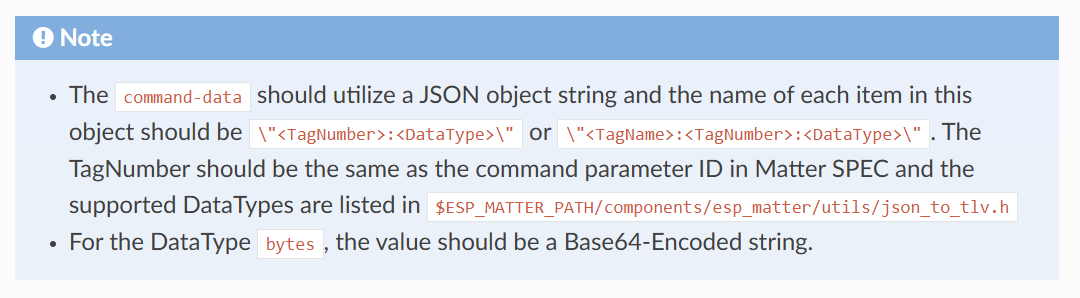
RTFM 🙂
I updated my strcpy to use the TLV JSON
strcpy(command_data_str, "{\"0:U8\": 128, \"1:U16\": 0, \"2:U8\": 0, \"3:U8\": 0}");and tried again.
This actually worked 🙂
Armed with a little more understanding, I went back to the Matter documentation and found this

You can see in the JSON how U8 means uint8 and U16 means uint16, for example. This is handy to know!
Stepping, Not Moving
Whilst I have the MoveToLevel command working, I realised it wasn’t suitable for my purposes.
MoveToLevel is absolute, setting the desired percentage. I want to increase or decrease brightness as the user holds down the button. I would need to actually track the brightness level in my Switch that I could increment or decrement it.
That seems find, until you consider that there might be another controller. Let’s say I start brightness at 0 and the user holds the button down until it reaches 50. That’s all fine. If the user then uses their phone to drop the brightness back to 10, my switch would now be out of sync! Should they hold my button down, the brightness would *jump* to 50 before dropping. Hardly ideal!
The Matter standard has this covered in the form of the Step command. This lets you dictate by how much you want the Level to move and in what direction! This means it will always start from the current level. It looks like this:
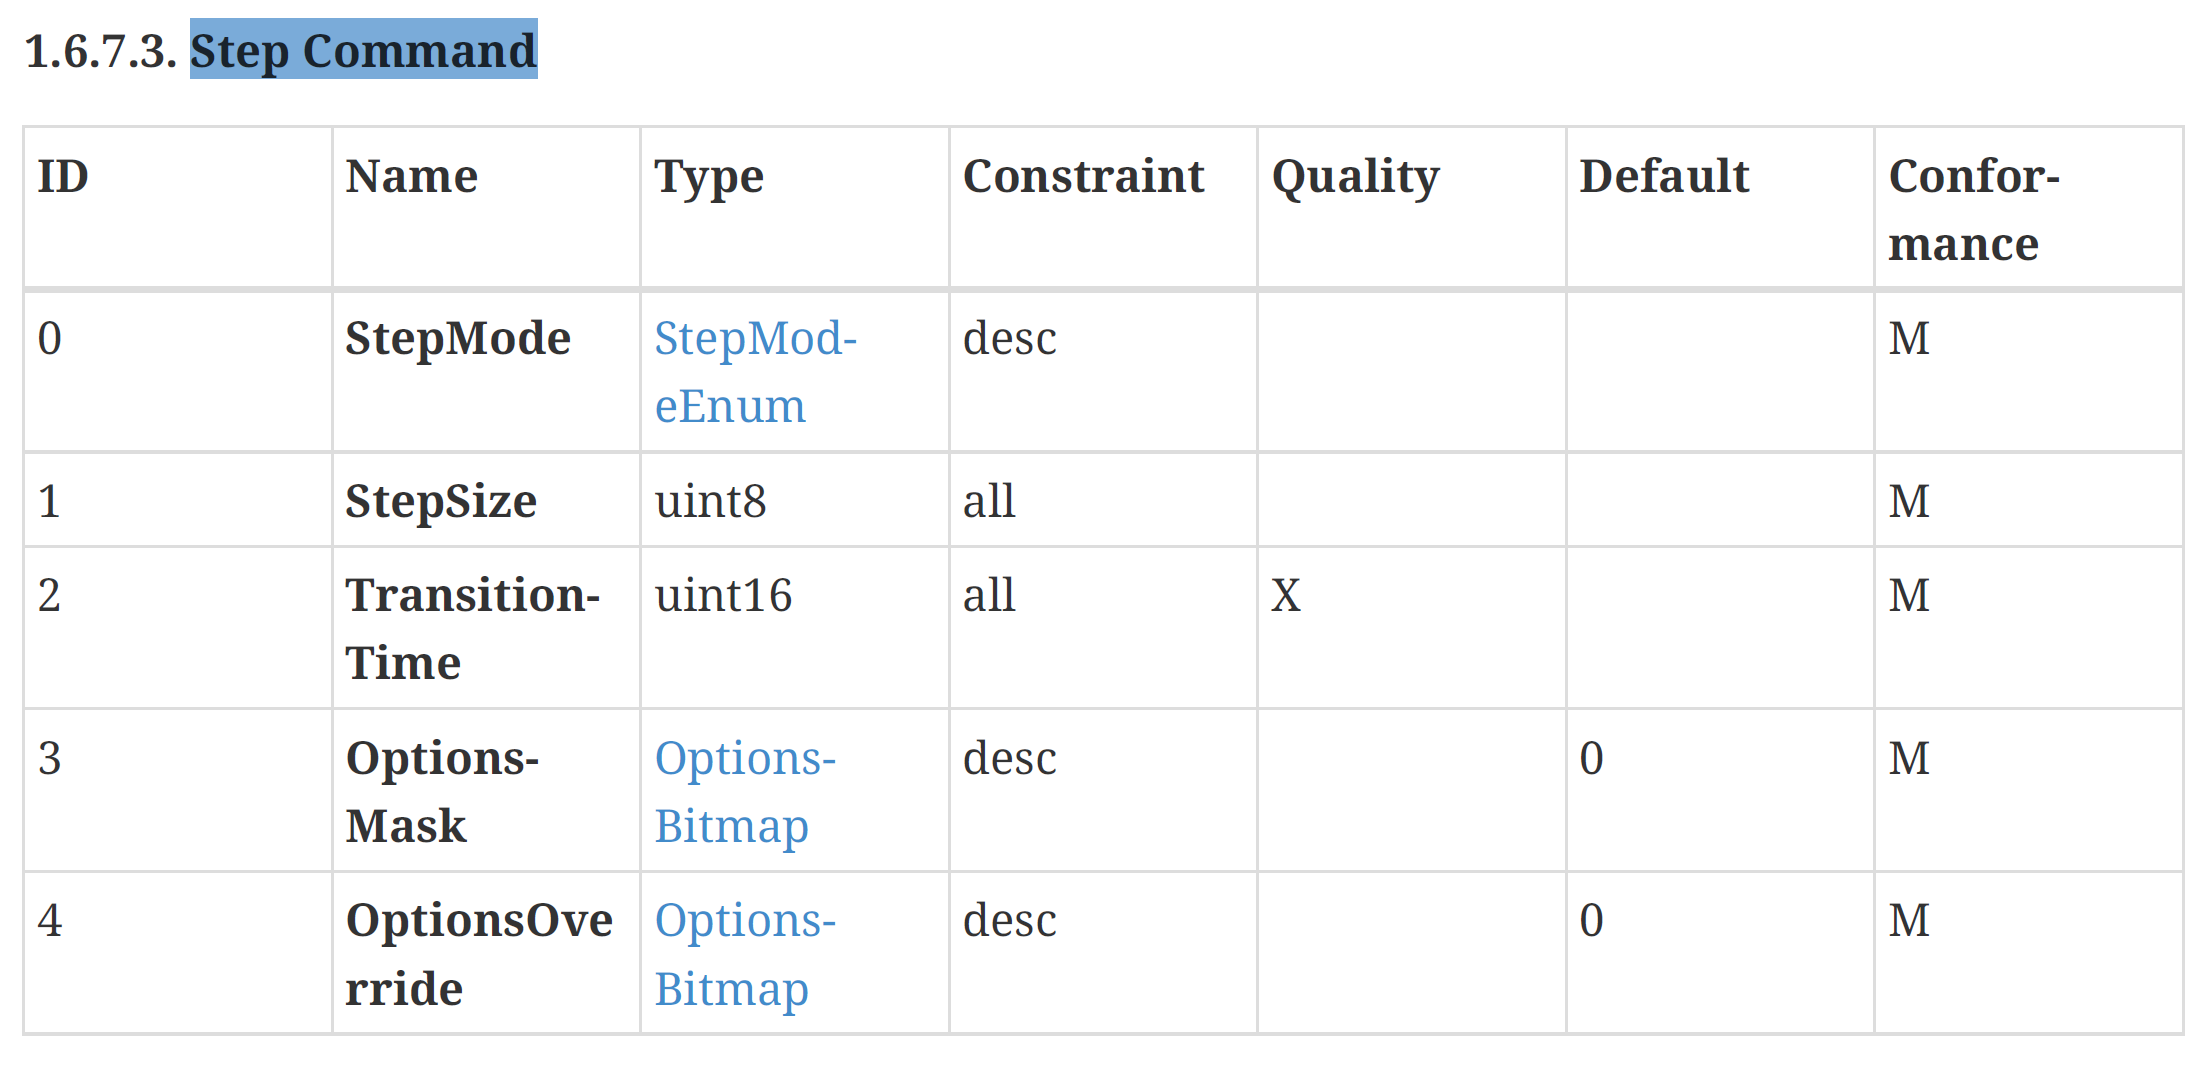
This is exactly what I need.
First step is changing the command I send on LongPress.
strcpy(command_data_str, "{\"0:U8\": 0, \"1:U8\": 3, \"2:U16\": 0, \"3:U8\": 0, \"4:U8\": 0}");This command then arrives at the Light correctly.

Whilst the step is being received, but strangely, the level only moves one percentage, despite me holding down the button for a few seconds.
I suspect this is because of how the Light itself is setup. I’ve spotted this in the code of the Light:
attribute::set_deferred_persistence(current_level_attribute);The documentation says this is the desired approach for rapidly changing values. You can set the value lots of times in a short space of time, but the esp-matter framework won’t persist it straight away. I think that’s what I’m seeing. I’m hammering Step commands at it and it’s just ignoring most of them.
I’m going to try and throttle the generation of the BUTTON_LONG_PRESS_HOLD events. Hopefully a slight delay of maybe 250ms or 500ms will give the Light time to persist each change.
Next time!
This post has gotten quite long, so I’m going to start another one. I’ll link to it from here when it’s ready.
If you’re interested in this kinda stuff, but sure to subscribe so you will get notified when I post again. For general smart home and DIY stuff, please check out my YouTube channel – https://youtube.com/@tomasmcguinness

Leave a comment