
In this post, I look at how you can commission a real, commercial Matter Smart Bulb with the chip-tool running on a Raspberry Pi!
You’ll need a Raspberry Pi, a Matter Smart bulb and access to a Thread network (or WiFi). This post will cover controlling a device that has already been commissioning and is On Network. I use iOS Home for that, but the Pairing steps will work with Android too.
Choosing a Smart Bulb
Up until now, I’ve never purchased any Matter certified hardware. Never had any real need to. All the bulbs in my house are either dumb, WiFi or Zigbee. When the LIFX bulb in my living stopped working, it was time to take a look at a Matter replacement.
Thread or WiFi
Aside from the manufacturer, the other decision to make with Matter is whether you go for WiFi or Thread.
For me, I wanted to give Thread a serious go. I have a Thread network already established thanks to my Apple HomePods. I also run an Open Thread Border Router on a Raspberry Pi. Thanks to both of these things, I *believe* I have good coverage across my house.
Most of the steps in this post are the same for WiFi,
With Thread chosen for the Matter network, I started looking for Smart Bulbs.
After a quick search online, I was pleased to see quite a few Matter-over-Thread devices on the market. I opted for some of these: Nanoleaf Essentials:

A pack of Three directly from Nanoleaf cost £12.50 with £5 for shipping. A little under £6 each. That was surprising cheap. What was more surprising was Amazon wanted £45 for the same box!!
Setting up with chip-tool
The chip-tool is provided as part of the Matter SDK and is used for testing,
The chip-tool will work with Linux or macOS. As I’m a Windows user, I run my chip-tool on a Raspberry Pi. You can use WSL (the Windows Subsystem for Linux), but it’s a complicated setup. Going down the Pi route is much easier.
Installation is done using something called Snapd, which is like a store for Linux applications. https://snapcraft.io/chip-tool
To use it, first install it.
sudo apt install snapd
Reboot at this stage and then install the chip-tool
sudo snap install chip-tool
You should now have have a working copy of the chip-tool!
We’ll now look at how to “commission” the device. Commissioning is the process of adding the device to the network of choice and establishing control over it.
Commissioning the Smart Bulb
Commissioning with Thread is trickier than with WiFi. With WiFi, you only need to know the SSID and the password. With Thread, you need something called the Operational Dataset (which contains all the details of the Thread network).
In this post I’ll show you the Easy (ish) ways to get chip-tool controlling the smart bulb. I’ll do a follow up post showing you how to do this without adding the device to iOS first.
The Easy (ish) Way
As mentioned, to join a Thread network you need a Dataset. In my case, the easiest way to join my Thread network WAS to use the iOS Home App. First, I’d the Home app to add the Bulb to the Thread network and then I’d use the chip-tool. One of Matter’s greatest features is that it allows multiple controllers!
Using iOS, scan the QR code on the side of the bulb.
This will start the pairing process. I won’t detail that here as it’s documented in a million different posts.
Once it has been added, you can now commission it with a second controller, the chip-tool. To start this process, you must put the device into Pairing Mode. iOS makes this easy.
You can long press on the Light in iOS and bring up the menu. Alternatively, bring up the colour/dimming control and click on the little cog.
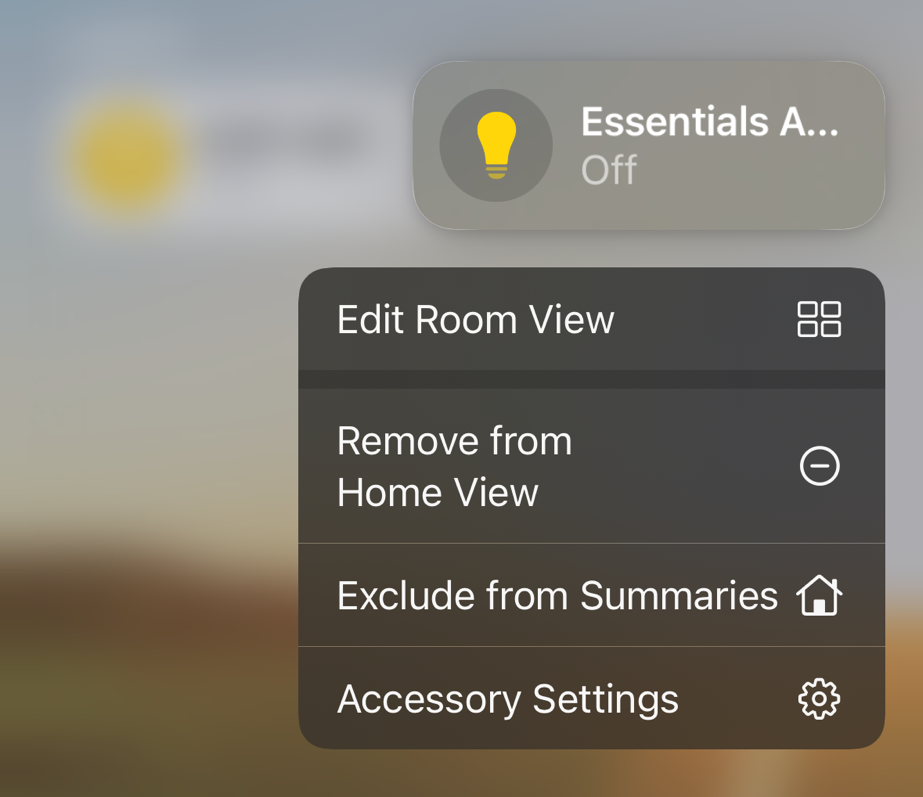
Scroll to the bottom and click the “Turn on Pairing Mode” button

After a second or two, you’ll get a popup giving you a new Setup Code.
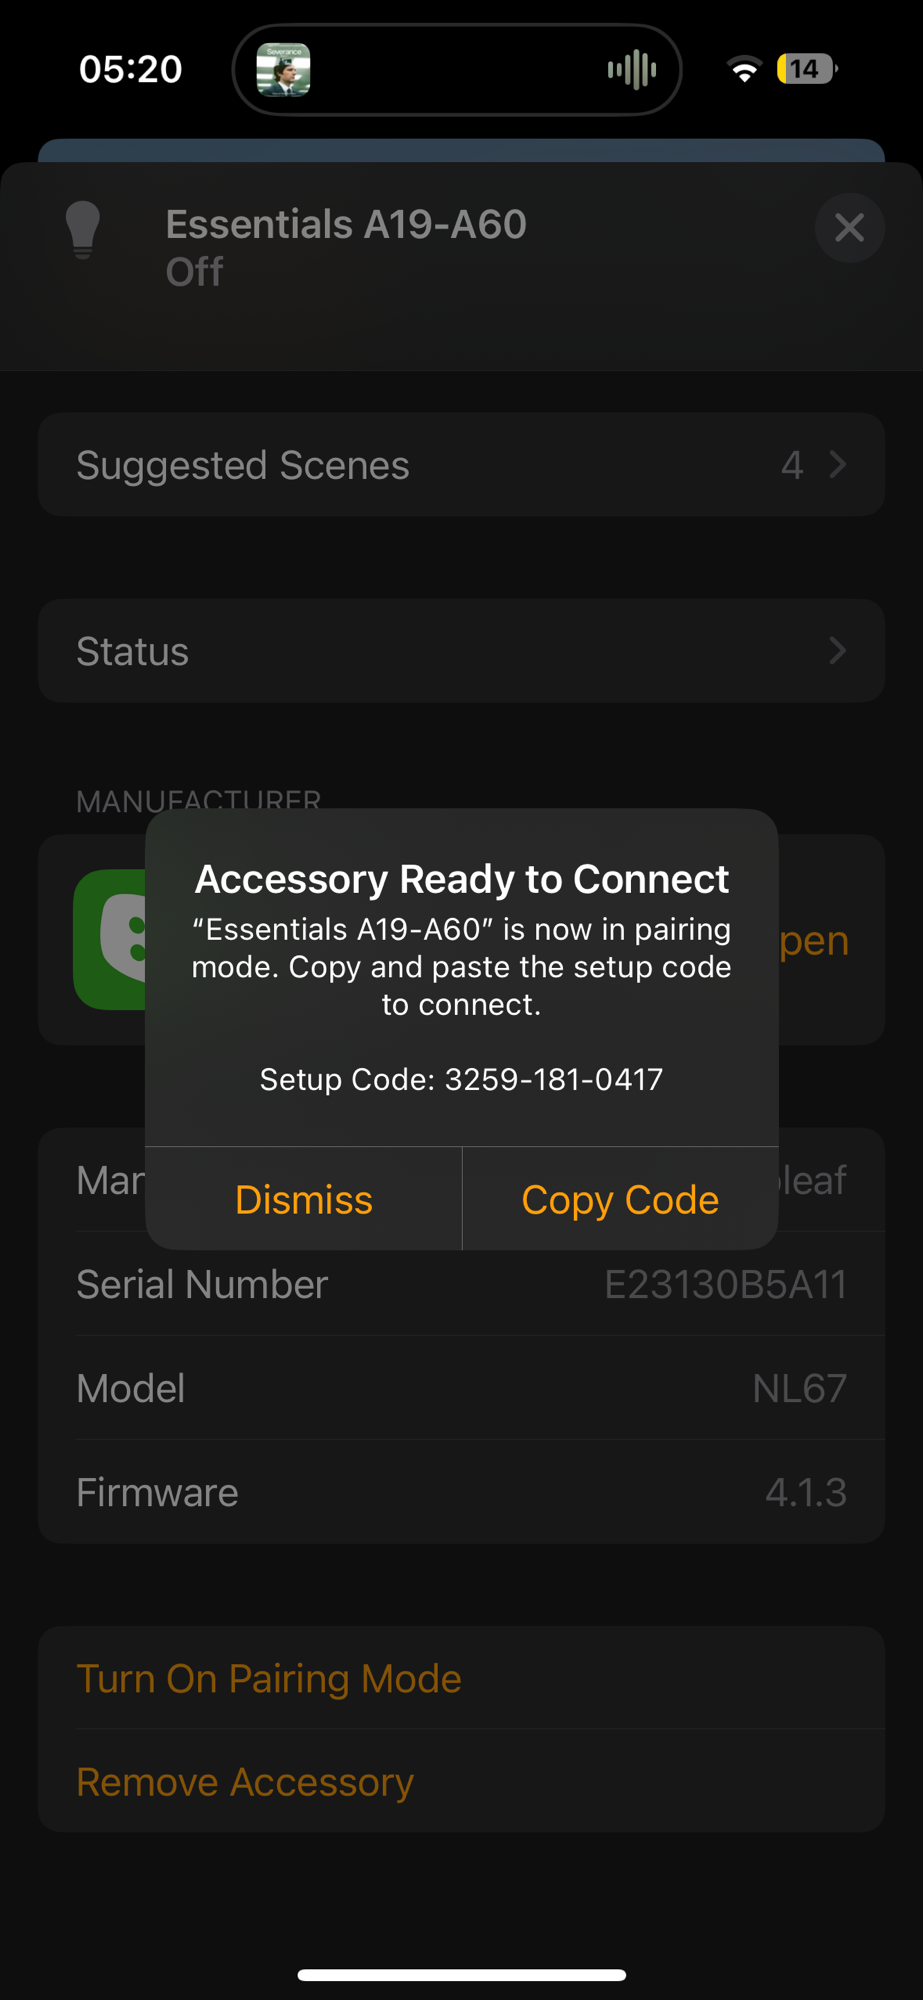
With our setup code, in this example 32591810417 (hyphens removed), it’s now time to return to the chip-tool and pair with the device!
chip-tool pairing code 0x60 32591810417
This command says I want to perform pairing using a code. I want to assign this device to node 0x60 and the last argument is the setup code. The nodeId of 0x60 is the devices address for the chip-tool. You’ll see this node in all the commands I run.
This will start to execute and, like me, you’ll get an error!

The pairing process fails during AttestationVerification.
AttestationVerification
I don’t fully understand this, but Attestation is how device prove are certified by the Connectivity Standards Alliance (CSA). It’s also the reason that DIY Matter devices with ESP32 get a warning from iOS says the accessory isn’t certified.
We’re using a test tool, so we have a test certificate. This means that the chip-tool fails to verify the device is genuine.
To get around this, we need to tell the chip-tool what certificates to use. According to the chip-tool documentation, all the production certificates are in the connectedhomeip project. Let’s pull down that git repository onto our Raspberry Pi.
git clone https://github.com/project-chip/connectedhomeip.gitI ran this in my home direction, so the path is ~/connectedhomeip
Once this repo is pulled down, we will run the pairing command again, this time with an additional parameter –paa-trust-store-path. Our pairing session will have timed out, so repeat the steps in iOS to turn on Pairing Mode again. Be sure to use the new setup code.
chip-tool pairing code 0x60 04257530103 --paa-trust-store-path ~/connectedhomeip/credentials/production/paa-root-certs/This time the command completes successfully!
– Edit 09/02/2026 – I discovered you can add this flag. It skips verification without worrying about certs.
--bypass-attestation-verifier trueYou *should* also get a notification on your iOS device to tell you that the device has been paired with another home!
Exercising Control
Now we have “control”, let’s see what we can do! We’ll start by getting basic information about the device.
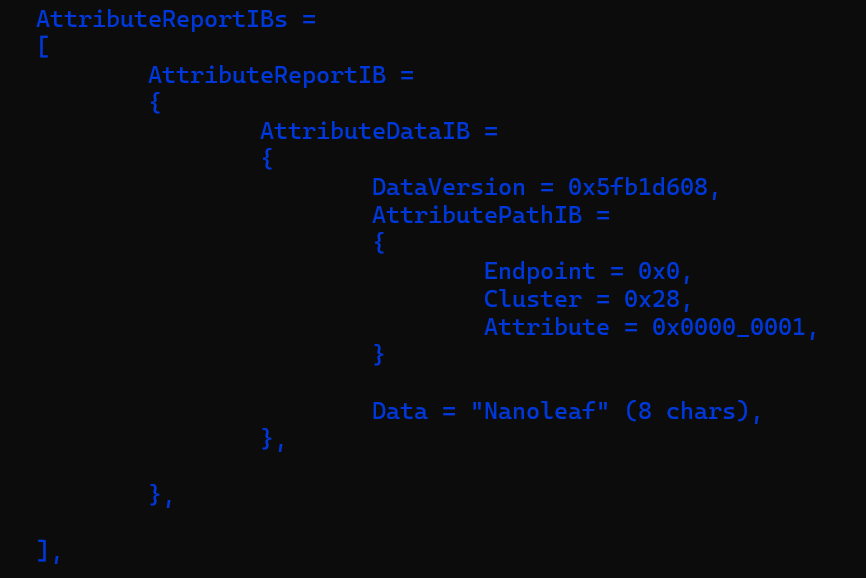
chip-tool basicinformation read vendor-name 0x60 0x0
When this command executes, you should see, in the resulting test, the word Nanoleaf
Let’s try operating it. For this command I’m using an Endpoint Id of 0x1 which is the actual Light.
chip-tool onoff on 0x60 0x1
Yahoo! The light switches on. Using the off command and we turn it off.
chip-tool onoff off 0x60 0x1
Amazing.
Summay
In this blog post I showed how to install the Matter chip-tool on a Raspberry Pi and how to pair it with a commercial smart bulb. I chose the Nanoleaf bulbs as I recognised the brand and because they supported Thread.
The process worked almost without a hitch, but I ran into an issue with certificates. Thankfully that was straightforward to resolve.
If you’re interested in Matter and how it works, using the chip-tool is a great way to delve into the internals and the how it all hangs together!
I’ll do another post showing how to use the chip-tool on its own to add the device into the Thread network without needing iOS.

Leave a comment