
As part of my exploration of the Matter Protocol, I’m fascinated by the support for Smart Appliances. That’s things like Washing Machines, Dishwashers, EV chargers, water heaters etc.
TL;DR;
I implemented a Matter Dishwasher emulator with hardware controls and an OLED display. It has an on/off button, allows the Program to be selected before its started and can be started and stopped. It also shows a simple countdown to mimic a real operation.
UPDATE: I’ve published a video to YouTube too, which shows the Tiny Dishwasher in action!
Making my own?
There aren’t many Matter appliances on the market at the moment, so choice is limited. That said, I wasn’t going to buy an appliance just so I can learn more about Matter 🤣. To that end, I decided it would be interested to build a toy Dishwasher using an ESP32. Just the shell, obviously, with some buttons and lights and enough code to make it work like a Dishwasher.
Without the water. Obviously.
Why a dishwasher? I wanted an appliance that had a varied energy consumption, so I could look at Matter’s energy management APIs at a future point.
My goto platform is the Espressif ESP32. I’m no embedded expert, but I’m familiar with the SDK and have built a few basic Matter devices already. Their Matter SDK supports Matter v1.4 at this time, which includes the Dishwasher. I had a XIAO ESP32-C6 board lying on my desk, which was a good starting point.
I began by copying the esp-matter Refridgerator example project and cleaned out the fridge code. I then added an Endpoint for the dishwasher.
dish_washer::config_t dish_washer_config;endpoint_t *endpoint = dish_washer::create(node, &dish_washer_config, ENDPOINT_FLAG_NONE, NULL);ABORT_APP_ON_FAILURE(endpoint != nullptr, ESP_LOGE(TAG, "Failed to create dishwasher endpoint"));
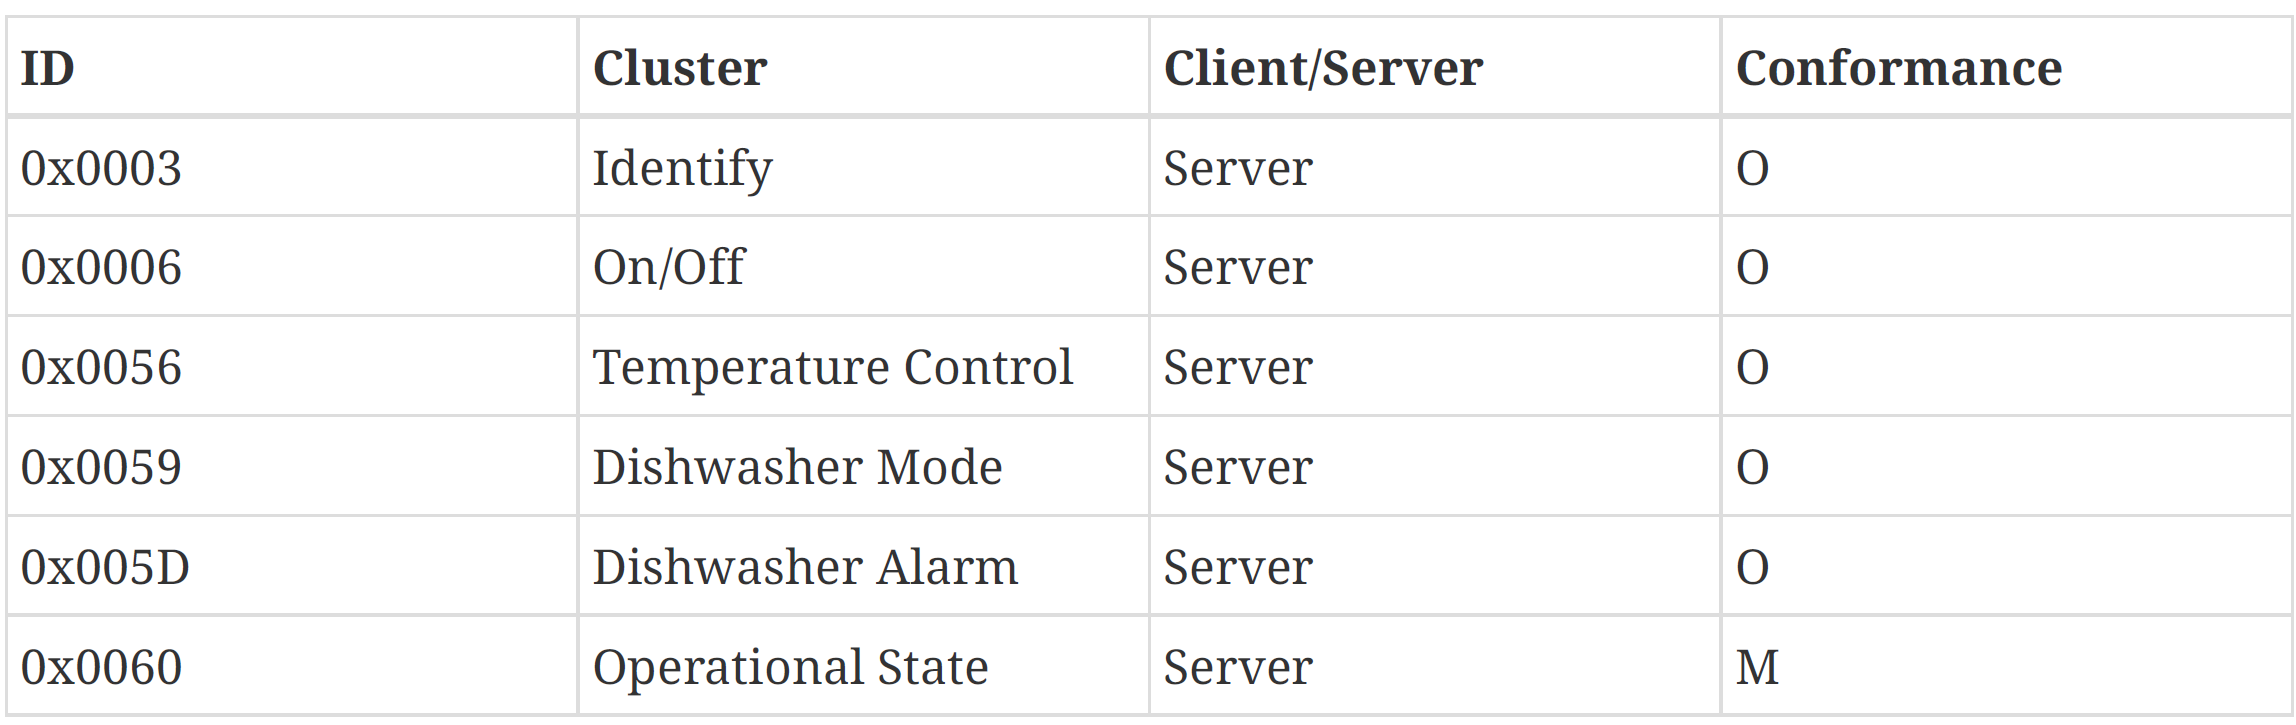
The only cluster that is Mandatory on the Dishwasher device type is the Operational State, which is how you start and stop the device.
I flashed the program and commissioned my “Dishwasher”, first with iOS and then with the chip-tool.
I then tried to fetch the Operational States from the device
chip-tool operationalstate read phase-list 0x05 0x01
This failed, horribly.

The ESP32 displayed this:

This hinted that I might need to a little more work 🙂
Operational State Cluster and Delegates
At this point, which I always seem to reach, I hit a brick wall. *Zero* documentation on how you might use the Operational State cluster. Sure, there was a cluster defined in the code and it has some attributes, but nothing to indicate how I might use it.
After a lot of reading, I discovered that the Operational Status Cluster was not the same as the On/Off Cluster (which I was familar with). It seems that some clusters require a special Delegate implementation. Not 100% sure what means, but it’s referenced here – https://docs.espressif.com/projects/esp-matter/en/latest/esp32/app_guide.html
It is expected that application will define it’s data and actions in the form of delegate-impl class and set the delegate while creating cluster/device type.
Whatever that is supposed to mean!
After trawling through a log of examples, and performing some educated guesswork, I ended up declaring an OperationStateDelegateImpl class.
namespace chip {namespace app {namespace Clusters {namespace OperationalState {class OperationalStateDelegateImpl:public Delegate { OperationalStateDelegateImpl():Delegate(){} chip::app::DataModel::Nullable<uint32_t> GetCountdownTime(); CHIP_ERROR GetOperationalStateAtIndex(size_t index, GenericOperationalState & operationalState); CHIP_ERROR GetOperationalPhaseAtIndex(size_t index, MutableCharSpan & operationalPhase); void HandlePauseStateCallback(GenericOperationalError & err); void HandleResumeStateCallback(GenericOperationalError & err); void HandleStartStateCallback(GenericOperationalError & err); void HandleStopStateCallback(GenericOperationalError & err); void PostAttributeChangeCallback(AttributeId attributeId, uint8_t type, uint16_t size, uint8_t * value);}...
With my delegate declared, I then passed it into my dishwasher.
static OperationalStateDelegate operational_state_delegate;dish_washer::config_t dish_washer_config;dish_washer_config.operational_state.delegate = &operational_state_delegate;
This compiled! I then implemented get the GetOperationPhaseAtIndex method, returning a single value.
CHIP_ERROR OperationalStateDelegateImpl::GetOperationalPhaseAtIndex(size_t index, MutableCharSpan &operationalPhase){ ESP_LOGI(TAG, "GetOperationalPhaseAtIndex"); chip::CopyCharSpanToMutableCharSpan(CharSpan::fromCharString("Warming Water"), operationalPhase); return CHIP_NO_ERROR;}
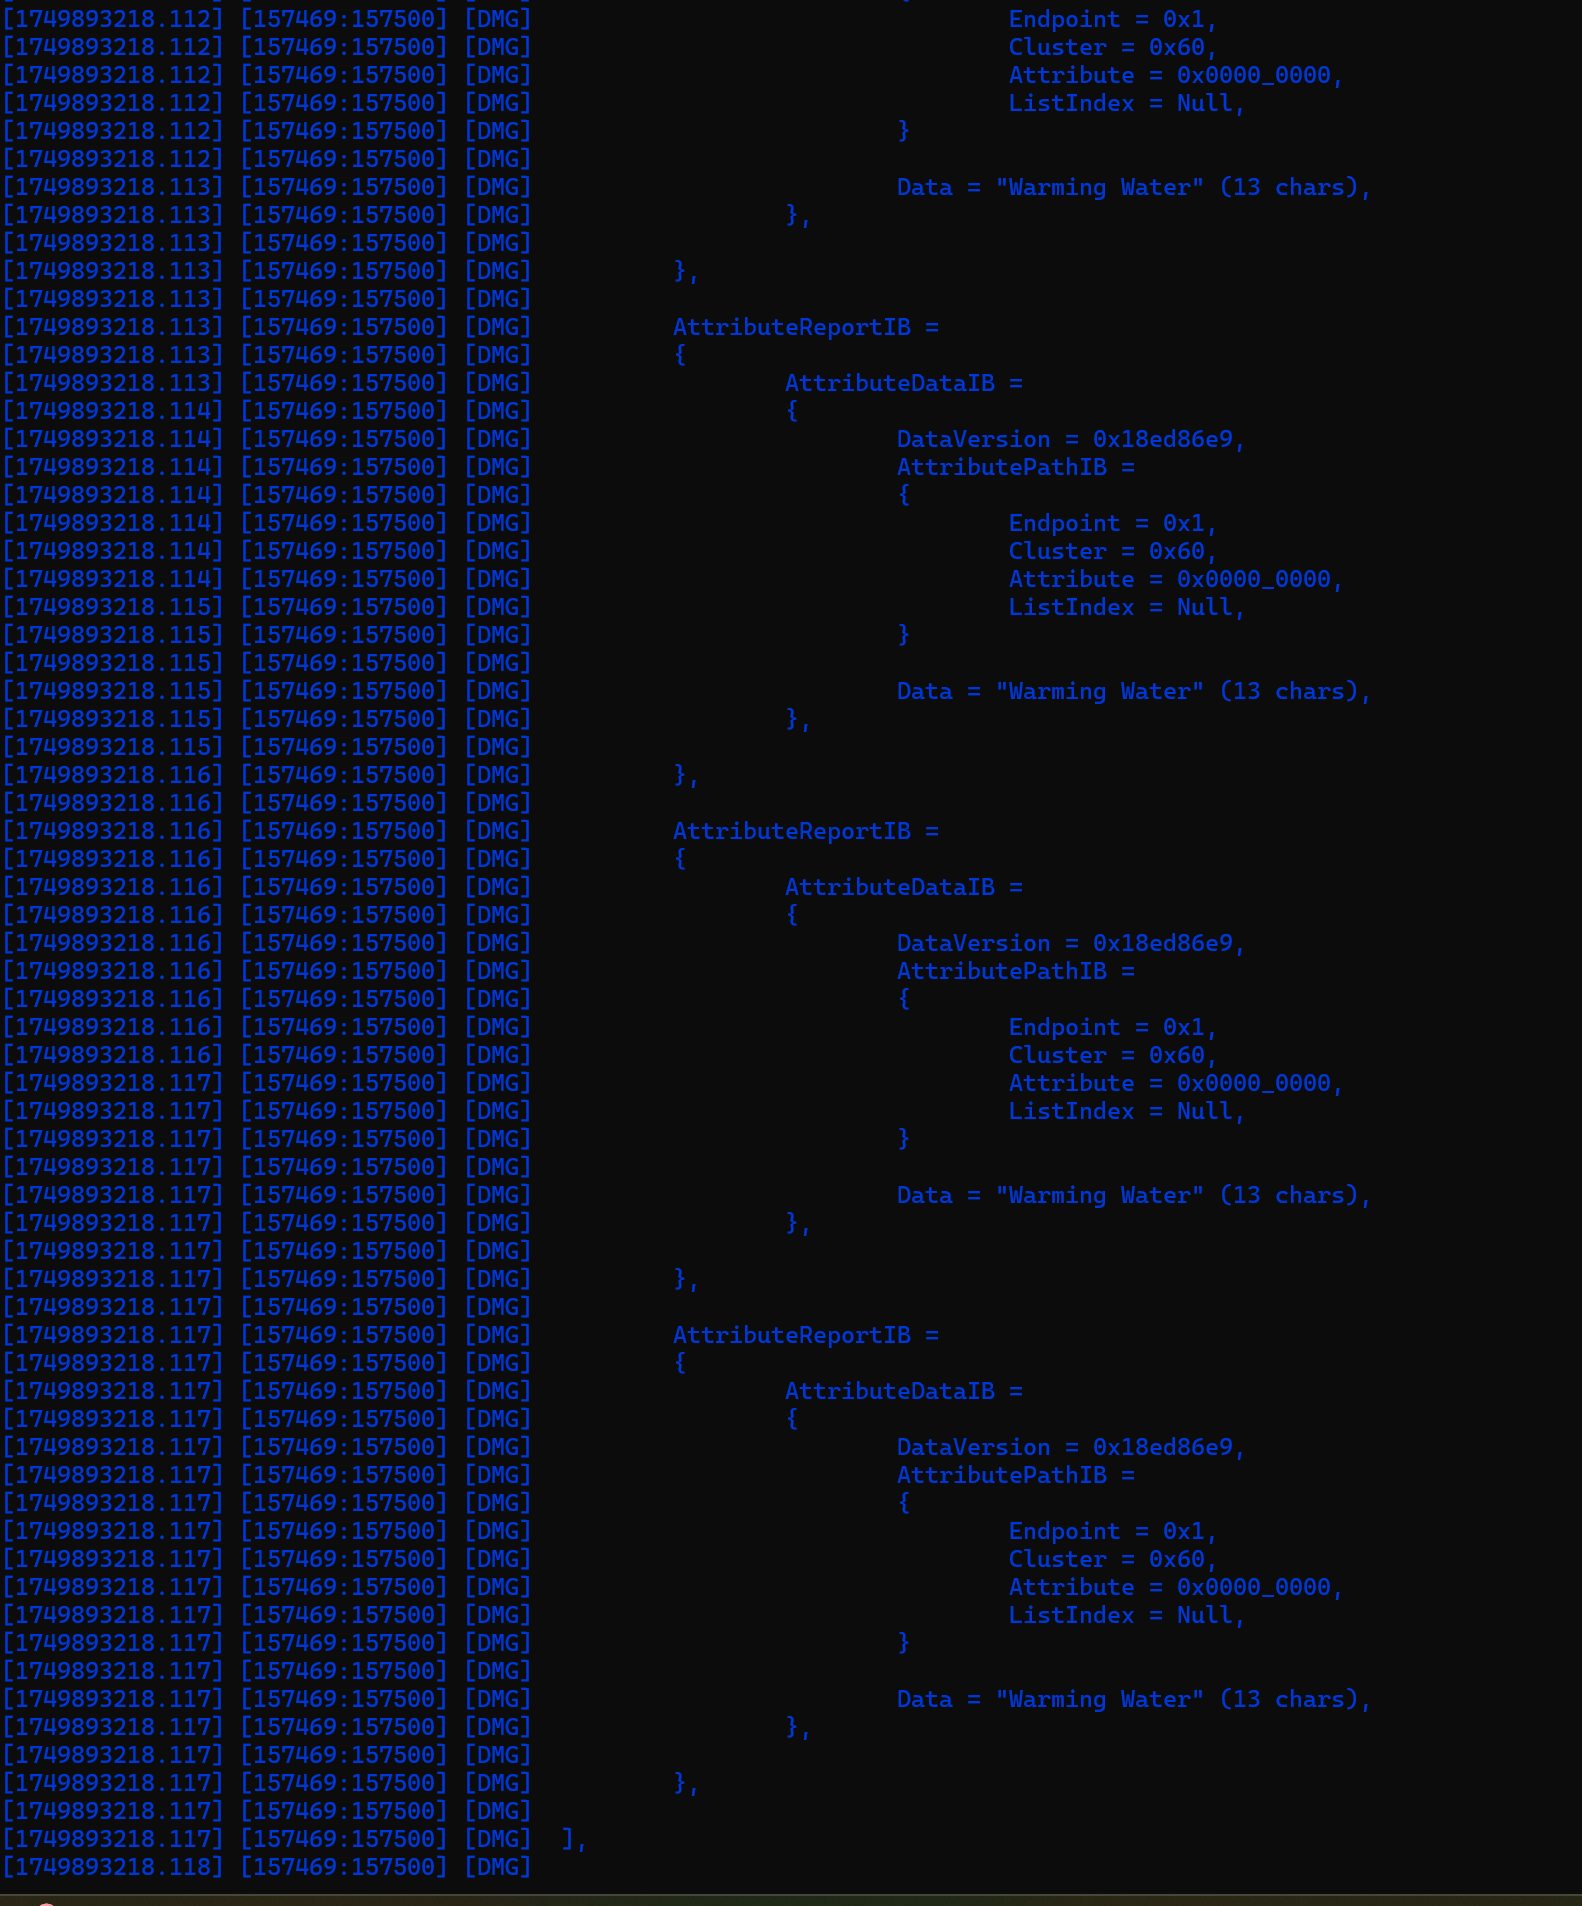
I then ran the same “read phase-list” chip-tool command and something odd happened. The GetOperationalPhaseAtIndex method was just called over and over again, resulting in a stream of output from the chip-tool.
I wondered if this wasn’t some sort of callback where you have to say when you’re done. I looked through more code and this confirmed my suspicion. I needed to say “CHIP_ERROR_NOT_FOUND” when I was finished. I updated my method to return a single “Warming Water”.
CHIP_ERROR OperationalStateDelegateImpl::GetOperationalPhaseAtIndex(size_t index, MutableCharSpan &operationalPhase){ ESP_LOGI(TAG, "GetOperationalPhaseAtIndex"); if(index == 0) { chip::CopyCharSpanToMutableCharSpan(CharSpan::fromCharString("Warming Water"), operationalPhase); return CHIP_NO_ERROR; } else { return CHIP_ERROR_NOT_FOUND; }}
This worked as expected, with the chip-tool showing a single value!

Some of this kinda made sense. Next thing on my list was the actual Operational State like Running etc.
Start, Stopping, Pausing and Resuming
The Operational State cluster also supports a few commands.
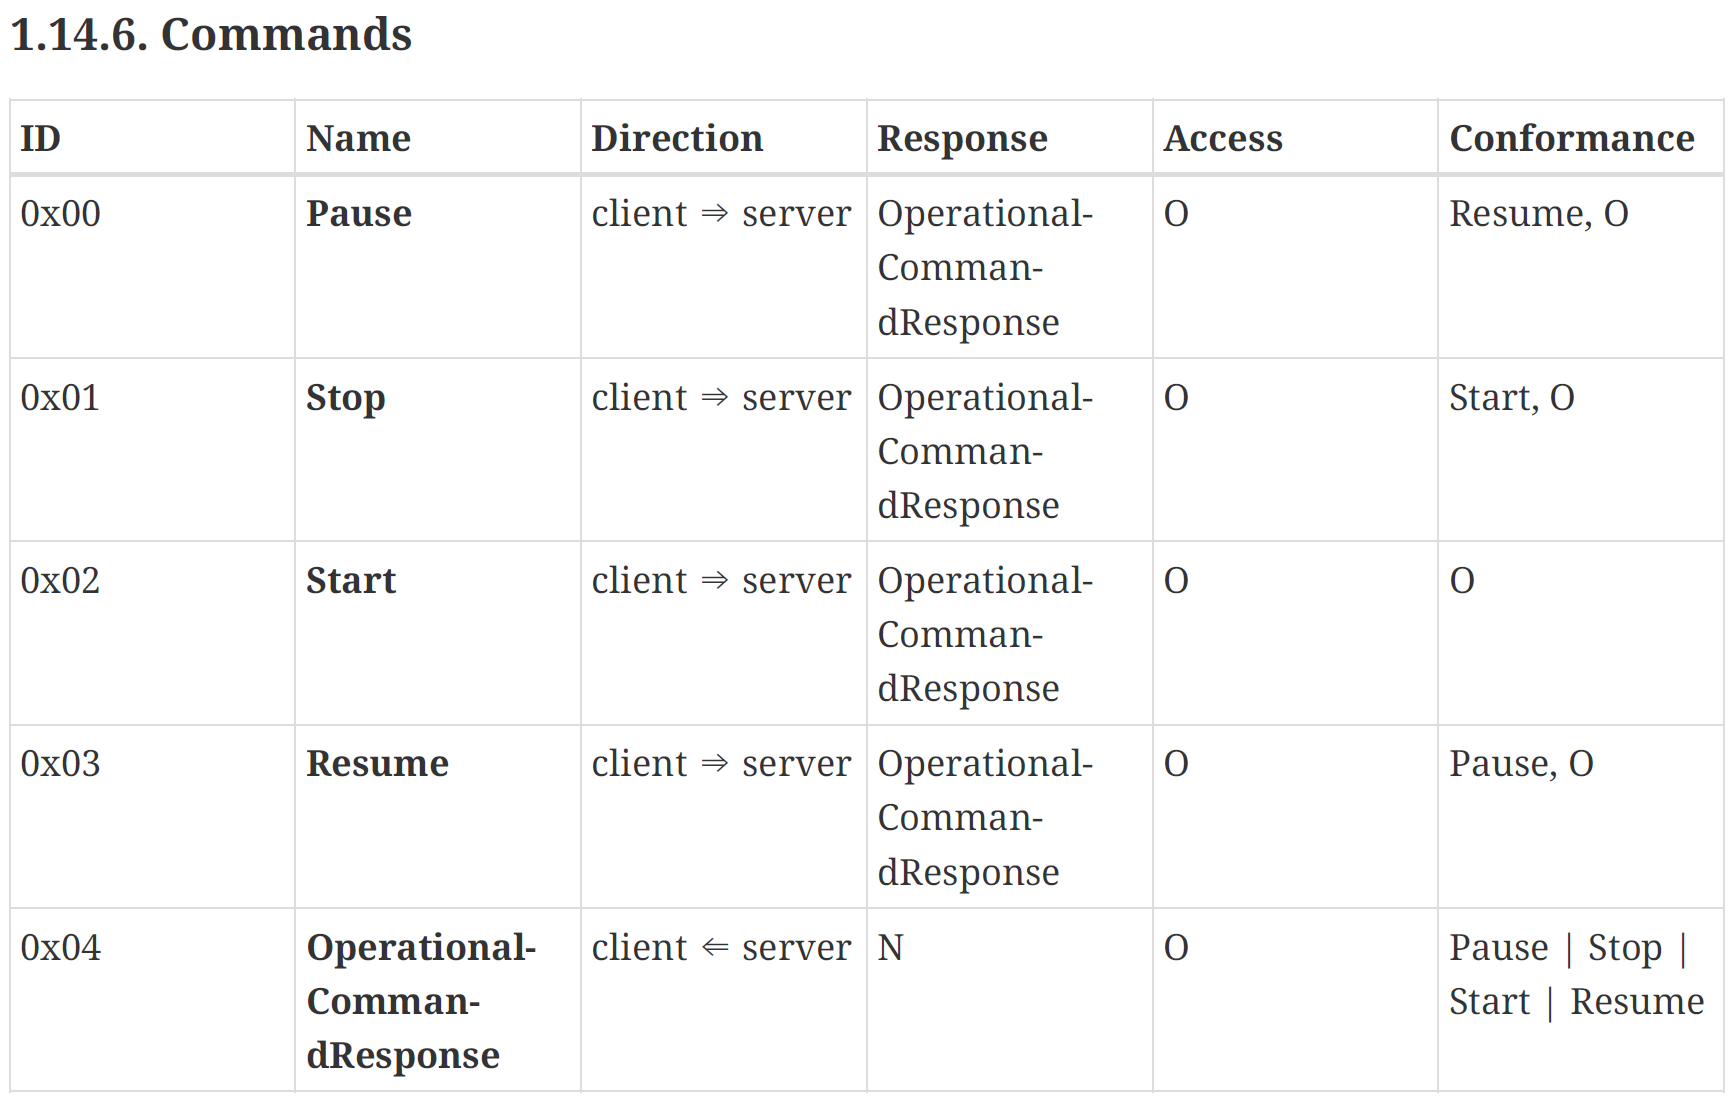
Using these, we can start, stop, pause and resume the device. In the case of a dishwasher, we could select the program we want and then start it. The program selection isn’t handled here, but the starting is!
As a starter for 10, I tried the start command
chip-tool operationalstate start 0x05 0x01
I expected this would invoke the HandleStartStateCallback I had implemented in the OperationalStateDelegateImpl.
Rather unsurprisingly, that didn’t happen.
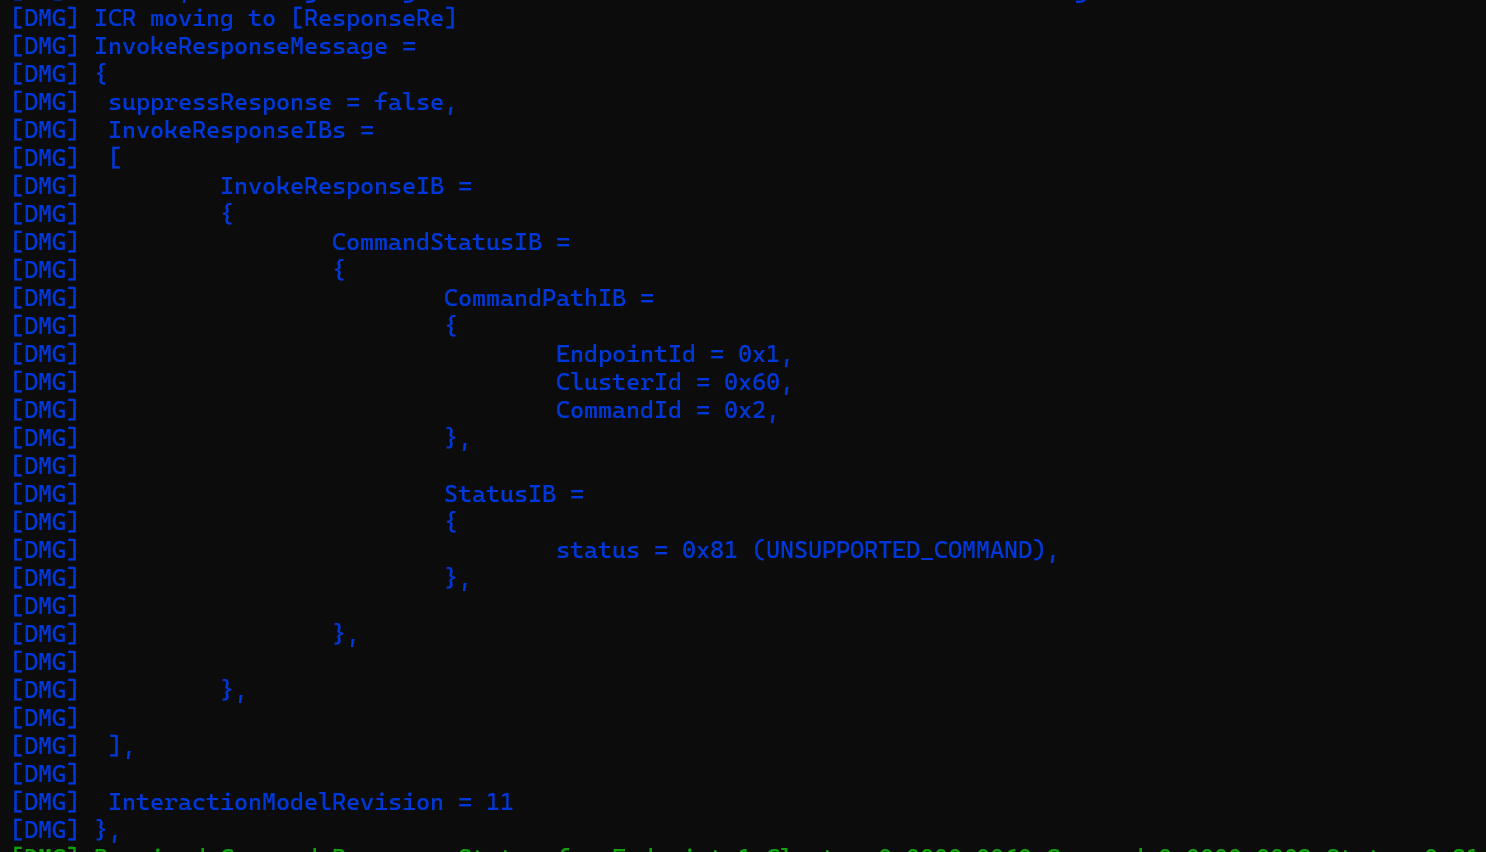
Computer says no. This kinda made sense, since the commands are actually all defined as Optional, meaning Matter or ESP wouldn’t enabled it by default.
This is where I ran into yet another brick wall. The scope of the esp-matter examples is actually terrible.
This one took a long time and some digging into the esp-matter and connectedhomeip code, but I eventually found something that worked:
operational_state::command::create_start(operational_state_cluster); operational_state::command::create_stop(operational_state_cluster); operational_state::command::create_pause(operational_state_cluster); operational_state::command::create_resume(operational_state_cluster);
These calls actually enable the commands inside the particular cluster. This aligns to my earlier comment about them being optional. When I dug into the OnOffCluster, I found that a call to create_toggle and create_on and that helped me guess!
Running
chip-tool operationalstate read accepted-command-list 0x05 0x01
yields

Which is nicely turned into this:

Firing off the chip-tool start now results in the callback being called!

LED all the things!
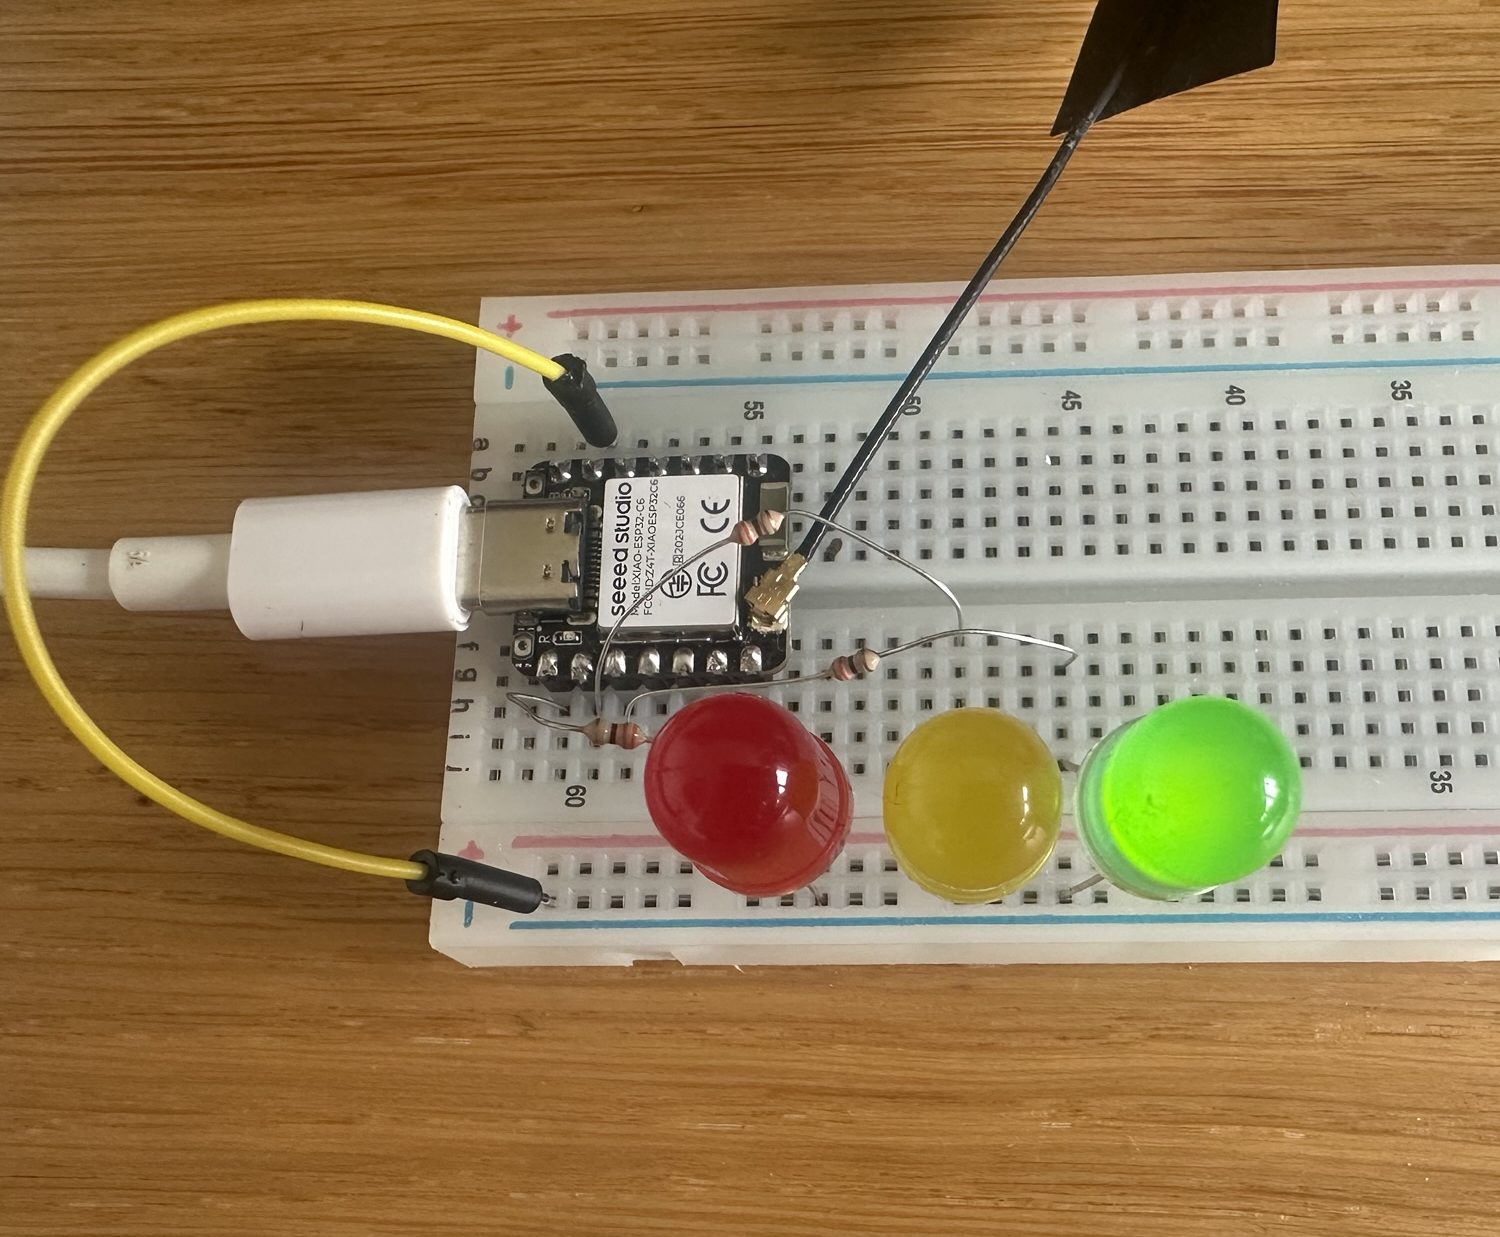
This wouldn’t be much of a project if I didn’t have some LEDs attached. Now that I have some sort of state control, I wanted to wire up some LEDS; Red = Stopped, Green = Running, Yellow = Paused.
To make that possible, I needed an instance in my code to represent the dishwasher’s state machine. I took this class from the SiliconLabs Dishwasher example and pruned it.
class DishwasherManager{public: esp_err_t Init(); void UpdateDishwasherLed(); void UpdateOperationState(OperationalStateEnum state); OperationalStateEnum GetOperationalState();private: friend DishwasherManager & DishwasherMgr(void); OperationalStateEnum mState; static DishwasherManager sDishwasher;};inline DishwasherManager & DishwasherMgr(void){ return DishwasherManager::sDishwasher;}
I then added another class to represent three LEDs
class StatusDisplay{public: esp_err_t Init(); void SetRed(bool state); void SetYellow(bool state); void SetGreen(bool state);private: friend StatusDisplay & StatusDisplayMgr(void); static StatusDisplay sStatusDisplay;};inline StatusDisplay & StatusDisplayMgr(void){ return StatusDisplay::sStatusDisplay;}
I then wired it up to three 10mm LEDs as I didn’t any 5mm ones to hand.
Dishwasher Modes
With some basic support for starting and stopping via the Operational State cluster, I wanted to continue expanding the Dishwasher functionality
From the Device Library documentation

This made sense. You first select the Mode on a Dishwasher before you kick off the cycle.
There are a few attributes in this cluster which we care about:

In implementing this, I followed the same pattern as the operational state, defining a delegate class, this time based off a ModeBase::Delegate.
class DishwasherModeDelegate : public ModeBase::Delegate
I grabbed an implementation from the all-clusters app example in the connectedhomeip SDK.
I then added the cluster to the endpoint, since DishwasherMode is optional in the Dishwasher device type.
static DishwasherModeDelegate dish_washer_mode_delegate;esp_matter::cluster::dish_washer_mode::config_t dish_washer_mode_config;dish_washer_mode_config.delegate = &dish_washer_mode_delegate;dish_washer_mode_config.current_mode = DishwasherMode::ModeNormal; esp_matter::cluster_t *dish_washer_mode_cluster = esp_matter::cluster::dish_washer_mode::create(endpoint, &dish_washer_mode_config, CLUSTER_FLAG_SERVER);ABORT_APP_ON_FAILURE(dish_washer_mode_cluster != nullptr, ESP_LOGE(TAG, "Failed to create dishwashermode cluster"));
This compiled, but unfortunately, the chip-tool started reporting an error when I requested the supported modes.
chip-tool dishwashermode read supported-modes 0x05 0x01
I got back an Unsupported Attribute error, which was really unexpected.
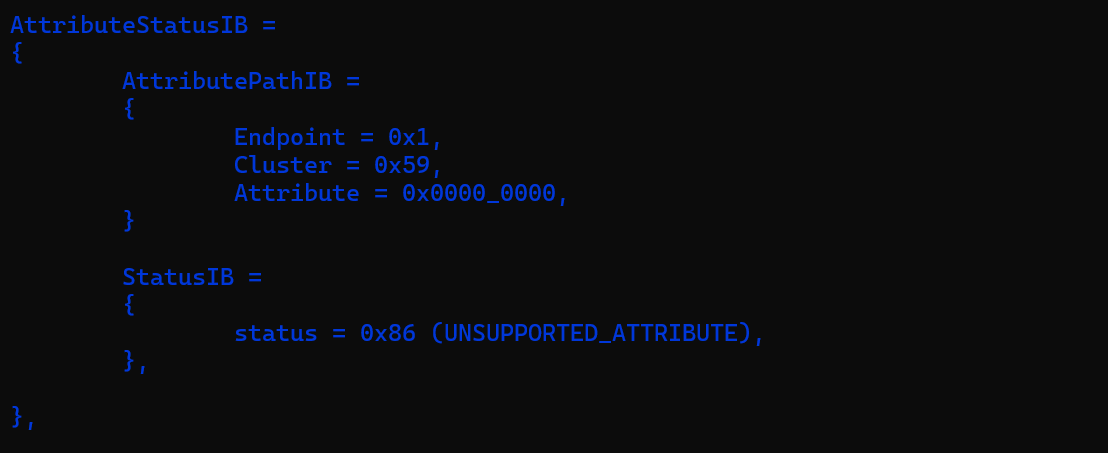
The DishwasherMode cluster shows that the SupportedModes attribute is mandatory, so I expected the SDK to implement this for me, like I’ve seen with the OnOff cluster. Trying the current mode attribute yielded success!
chip-tool dishwashermode read current-mode 0x05 0x01

Why would one work, but not the other??
The clue lay in the esp-matter SDK
if (config) { mode_base::attribute::create_current_mode(cluster, config->current_mode);} else { ESP_LOGE(TAG, "Config is NULL. Cannot add some attributes.");}
If I’m reading this correctly, the current_mode attribute is created because I’m sending the current_mode into the configuration. There is *no* mention of the supported_modes attribute. Three reasons I could think of; “a bug”, “it’s added somewhere else”, or “I have no idea what I’m doing”.
I looked through the code and decided to just try and create the attribute myself.
esp_matter::cluster::mode_base::attribute::create_supported_modes(dish_washer_mode_cluster, NULL, 0, 0);
I knew the Delegate had methods for supported modes and running the supported-modes command again now yielded a result! I have Normal, Heavy and Light.
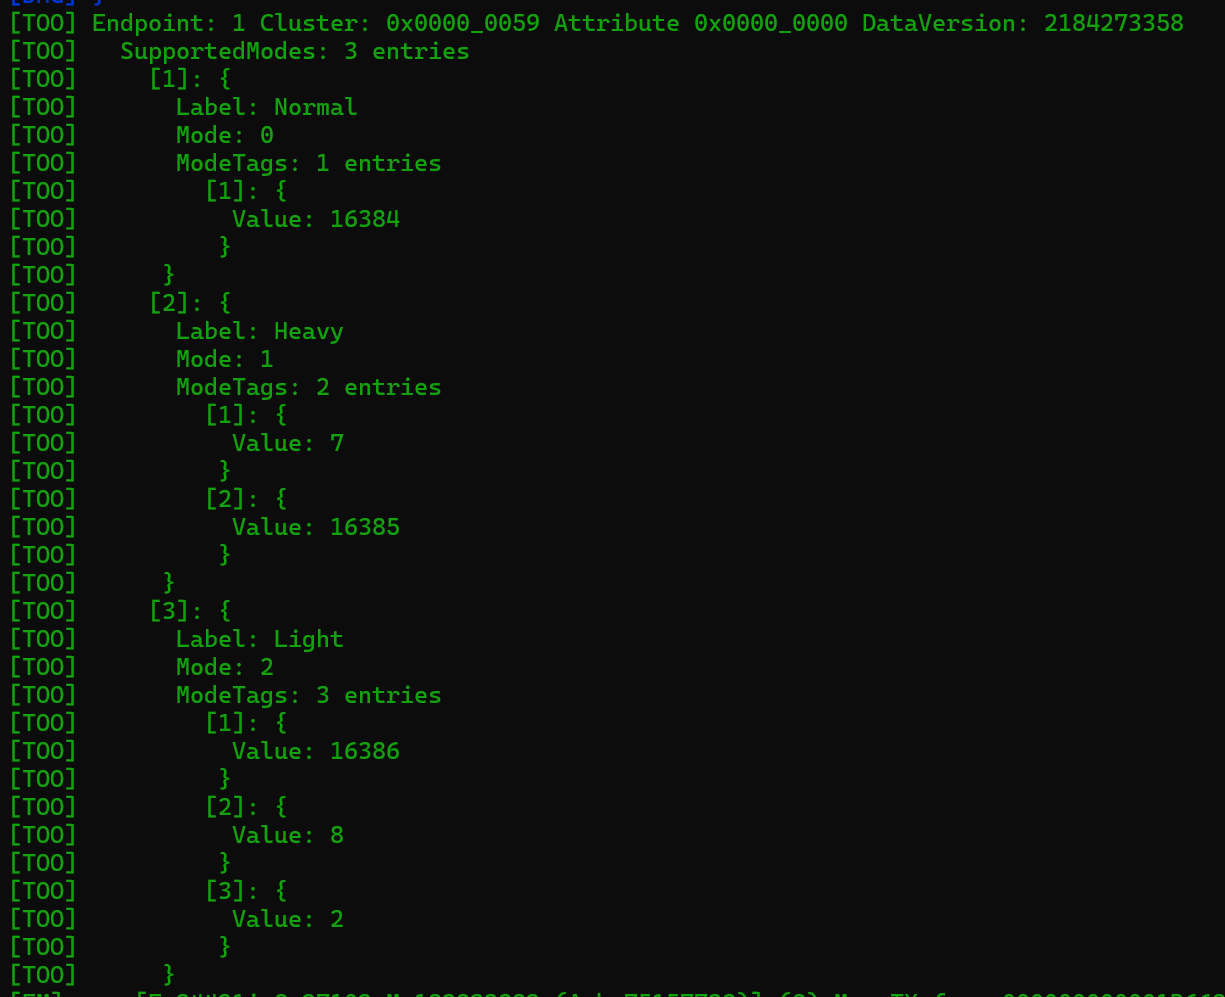
This almost aligns to the definition I copied, but I’m not sure what ModeTags are at this juncture. Not to worry.
I now have a list of supported modes and a current mode. Next in my head was a way to choose the current mode and for that I was thinking LCD Display and Rotary Encoder.
Rotary Encoder
I already had experience getting a rotary encoder to work. I just put the code into a C++ class call ModeSelector.
To pass the rotations of the dial into the DishwasherManager, I added two new methods:
void SelectNextMode();void SelectPreviousMode();
I then modified my dimmer switch code to look like this:
if (pulse_count != current_pulse_count){ int pulse_difference = pulse_count - current_pulse_count; current_pulse_count = pulse_count; ESP_LOGI(TAG, "Pulse Difference: %d", pulse_difference); if(pulse_difference < 0) { DishwasherMgr().SelectNextMode(); } else { DishwasherMgr().SelectPreviousMode(); }}
I used the Next & Previous terms so that the ModeSelector had no responsibility/knowledge of the number of modes etc.
Then I got a bit stuck.
void DishwasherManager::SelectNextMode(){ ESP_LOGI(TAG, "SelectNextMode called!"); mMode++; if(mMode > 3) { mMode = 0; } ESP_LOGI(TAG, "Mode is %d", mMode); DishwasherMode::Instance()->UpdateCurrentMode(mMode); UpdateDishwasherDisplay();}
As soon as I turn the encoder and try to update the CurrentMode via the DishwasherMode::Instance, the codes goes into a crash loop.
E (2550) chip[DL]: Chip stack locking error at '/home/tomasmcguinness/esp/esp-matter/connectedhomeip/connectedhomeip/src/app/reporting/reporting.cpp:40'. Code is unsafe/racyE (2560) chip[-]: chipDie chipDie chipDie
“chipDie” is not a very inspiring term.
Following the guidance here, I tried this:
esp_matter::lock::chip_stack_lock(portMAX_DELAY);DishwasherMode::Instance()->UpdateCurrentMode(mMode);esp_matter::lock::chip_stack_unlock();
but nothing changed. I then tried the other option, using a method
static void WorkHandler(intptr_t context){ uint8_t mode = (uint8_t)context; DishwasherMode::GetInstance()->UpdateCurrentMode(mode);}chip::DeviceLayer::PlatformMgr().ScheduleWork(WorkHandler, mMode);
This actually appeared to work. I could rotate the encoder and see the values changes! When I queried the current-mode using the chip-tool, it would be correct. However, as soon as I flashed the device, the crash loop restarted 😦
This crash appeared to be related to the SDK reload the value of the current mode from storage and then try to update it. As ever, I was 99.9% confident that it was related to how I was using the code.
Turns out it might actually be a bug in the esp-matter SDK. After a lot of debugging, I found the issue was down to setting the delegate like this:
dish_washer_mode_config.delegate = &dish_washer_mode_delegate;
During the dish_washer_mode::create, the esp-matter SDK would instantiate a ModeBase instance and try to configure it. This would result in the crash. So I commented this code out and left the ModeBase creation to the emberAfDishwasherModeClusterInitCallback implementation. I have raised an issue – https://github.com/espressif/esp-matter/issues/1468
With the code working, and stable, it was now time to actually display the selected dishwasher mode and the operational status of the dishwasher!
LCD Display
In my bits box, I had a 1602 2×16 LCD display that I bought years ago (and never used). I decided to wire that up and give it a go.
Unfortunately, not matter what I tried, library, wiring, coding, the display didn’t show what I wanted. I spend many hours trying to figure out how to make it work, before abandoning it.

I even bought another 1602 to make sure my old one wasn’t faulty. That just show anything!
OLED Display
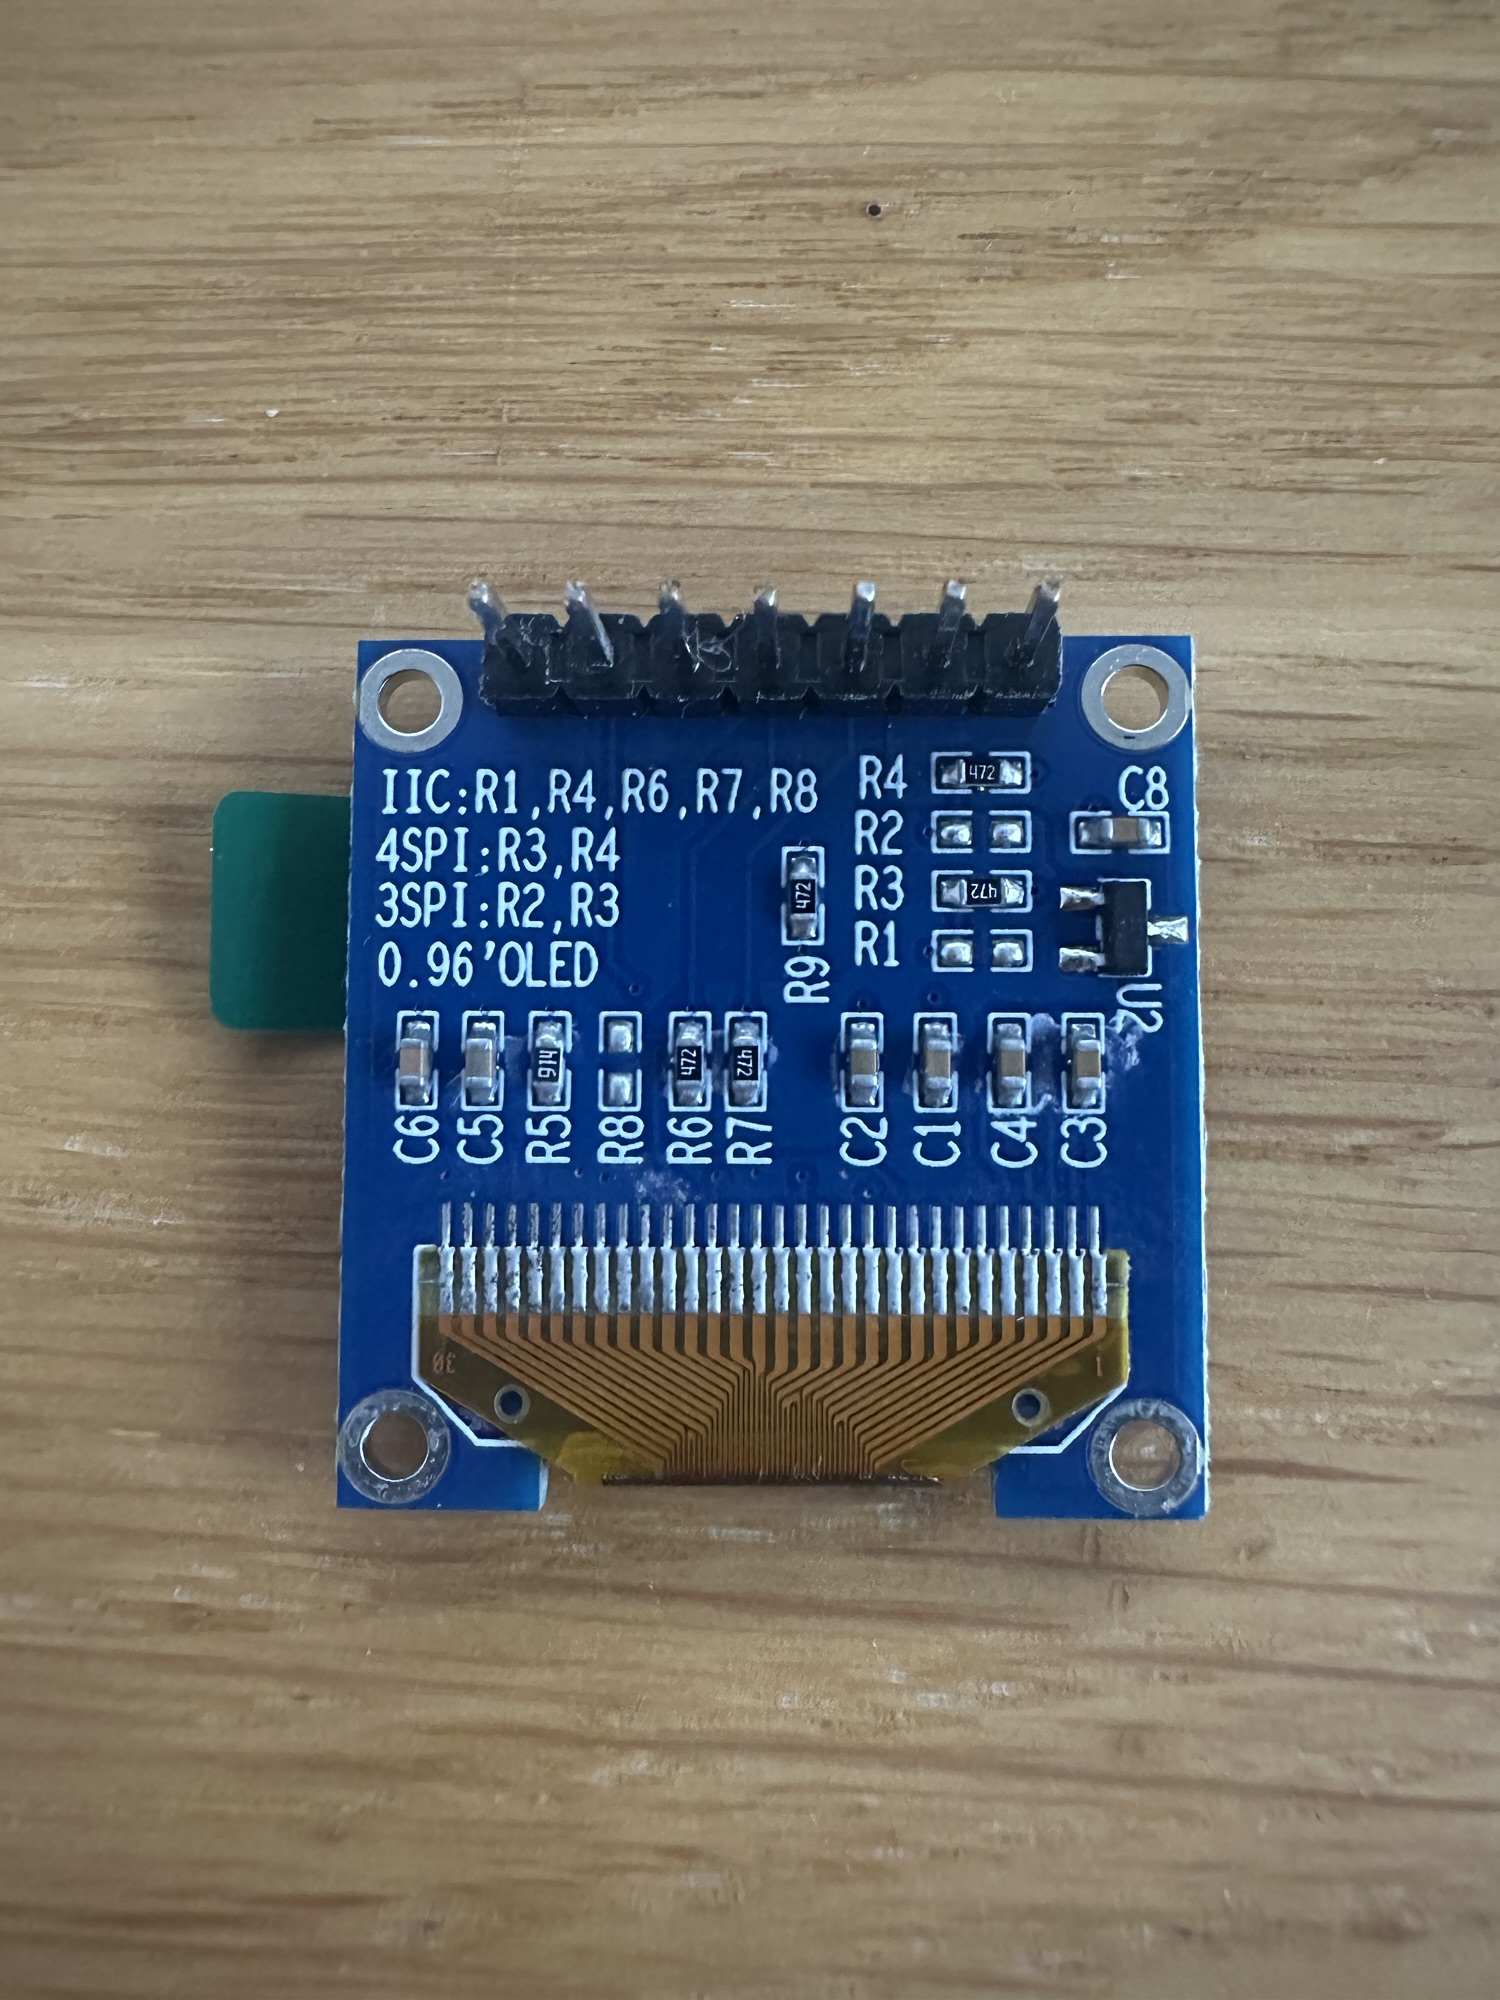
In the interests of not sinking more time into the 1602 Display, I decided to try something else. When I ordered the other 1602, I ordered some OLED displays too as a backup. This, unlike the 1602, has a built in driver in the ESP SDK.
To make it work with I2C, I had to remove a resistor from the rear of the board and solder a blob onto two other resistor terminals. Nothing is easy 🙂

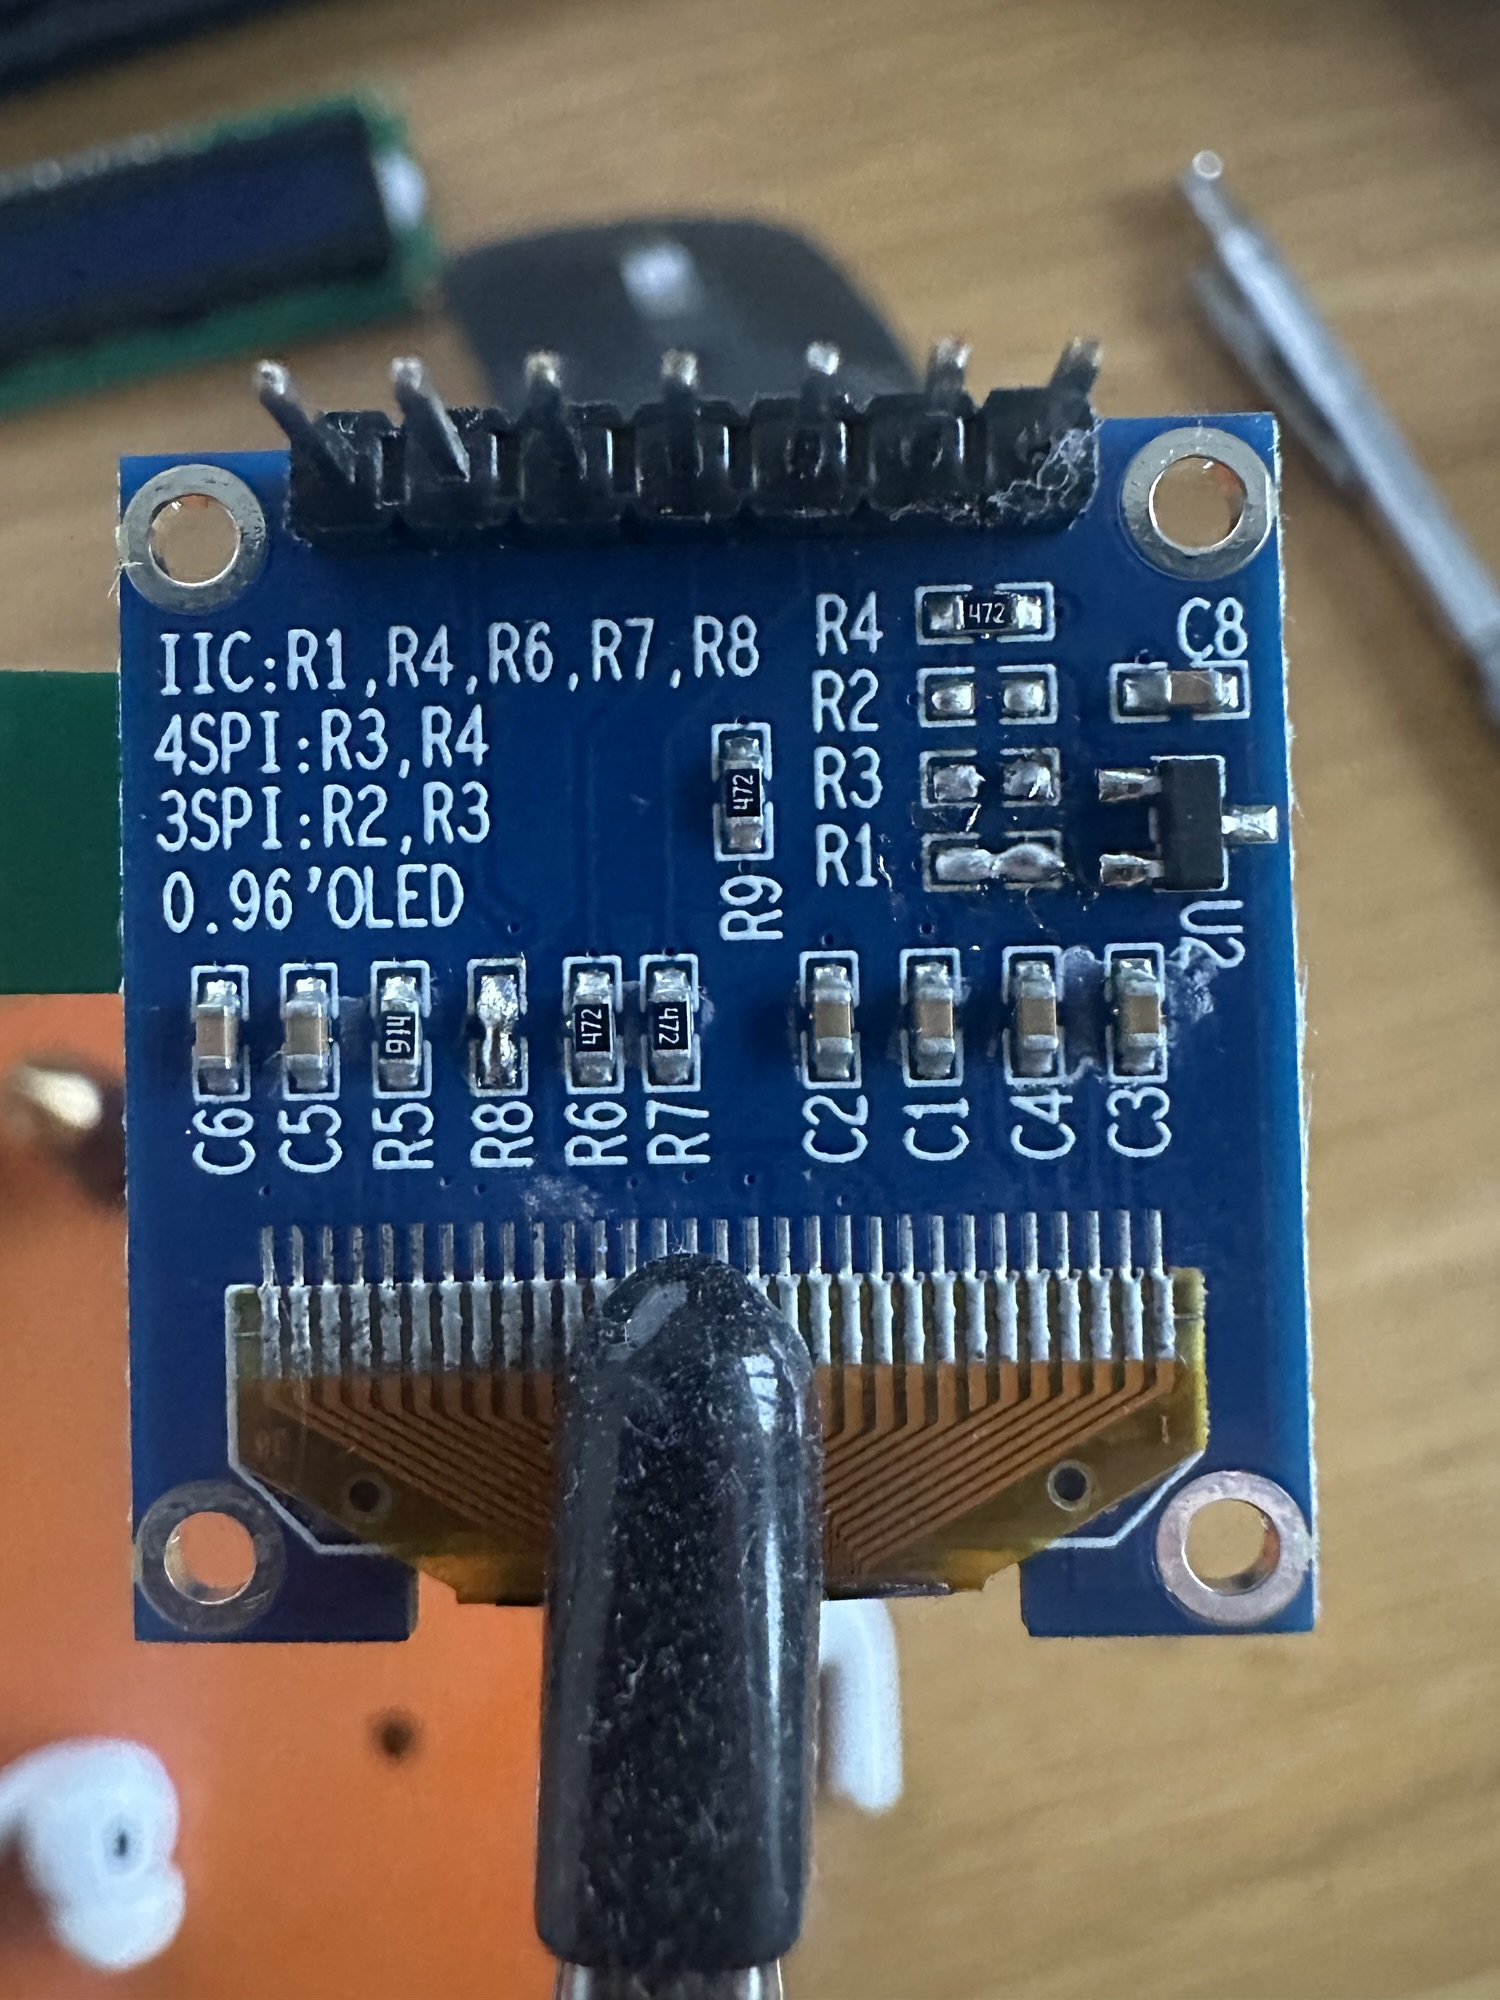
I2C just needs two wires, SDA and SCL, so the wiring is much easier than the 1602. It’s worth noting that you can get an I2C driver for the 1602 displays. I’ll probably give that a try as I do like the LCD displays retro look.
I got it working easily enough, but the code throws errors all over the place! It doesn’t seem to impact the overall operations, but the text on the display is supposed to scroll.
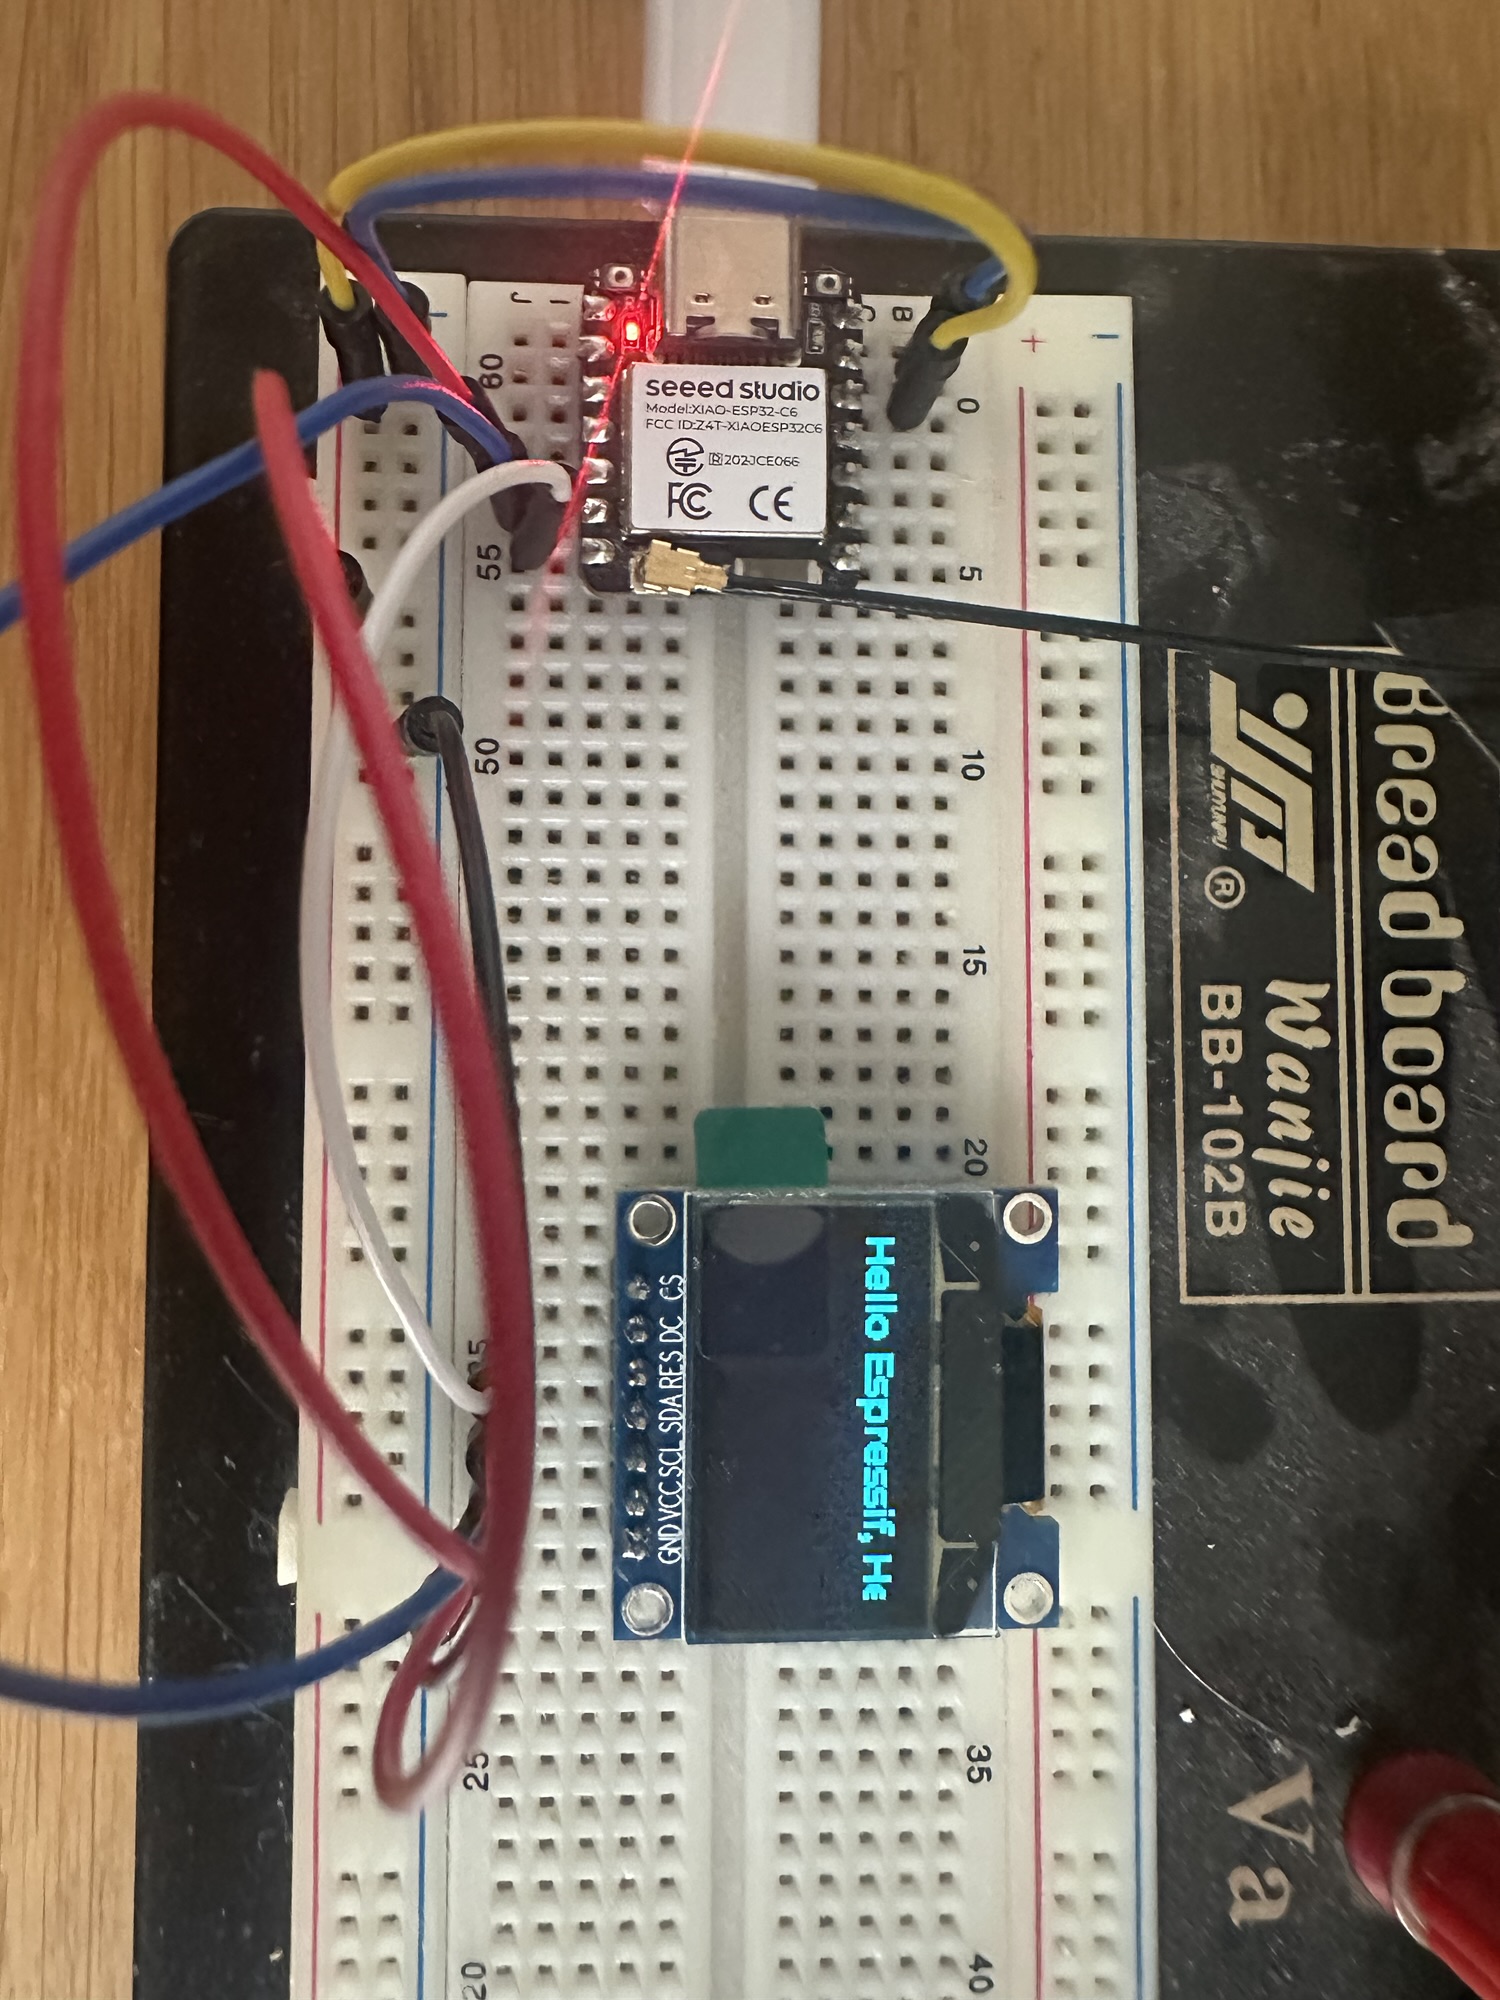
I copied across the implementation into my StatusDisplay class and tried it.

Too damn big!
I recalled I’d enabled additional logging in the CHIP libraries, so I turned that off and *phew* it fit. Just.

I’m using the stock partitions that offers two 2MB partitions, so OTA updates can be performed. if I run out of space, I’ll just nuke the 2nd partition. I don’t really need OTA updates for this anyway.
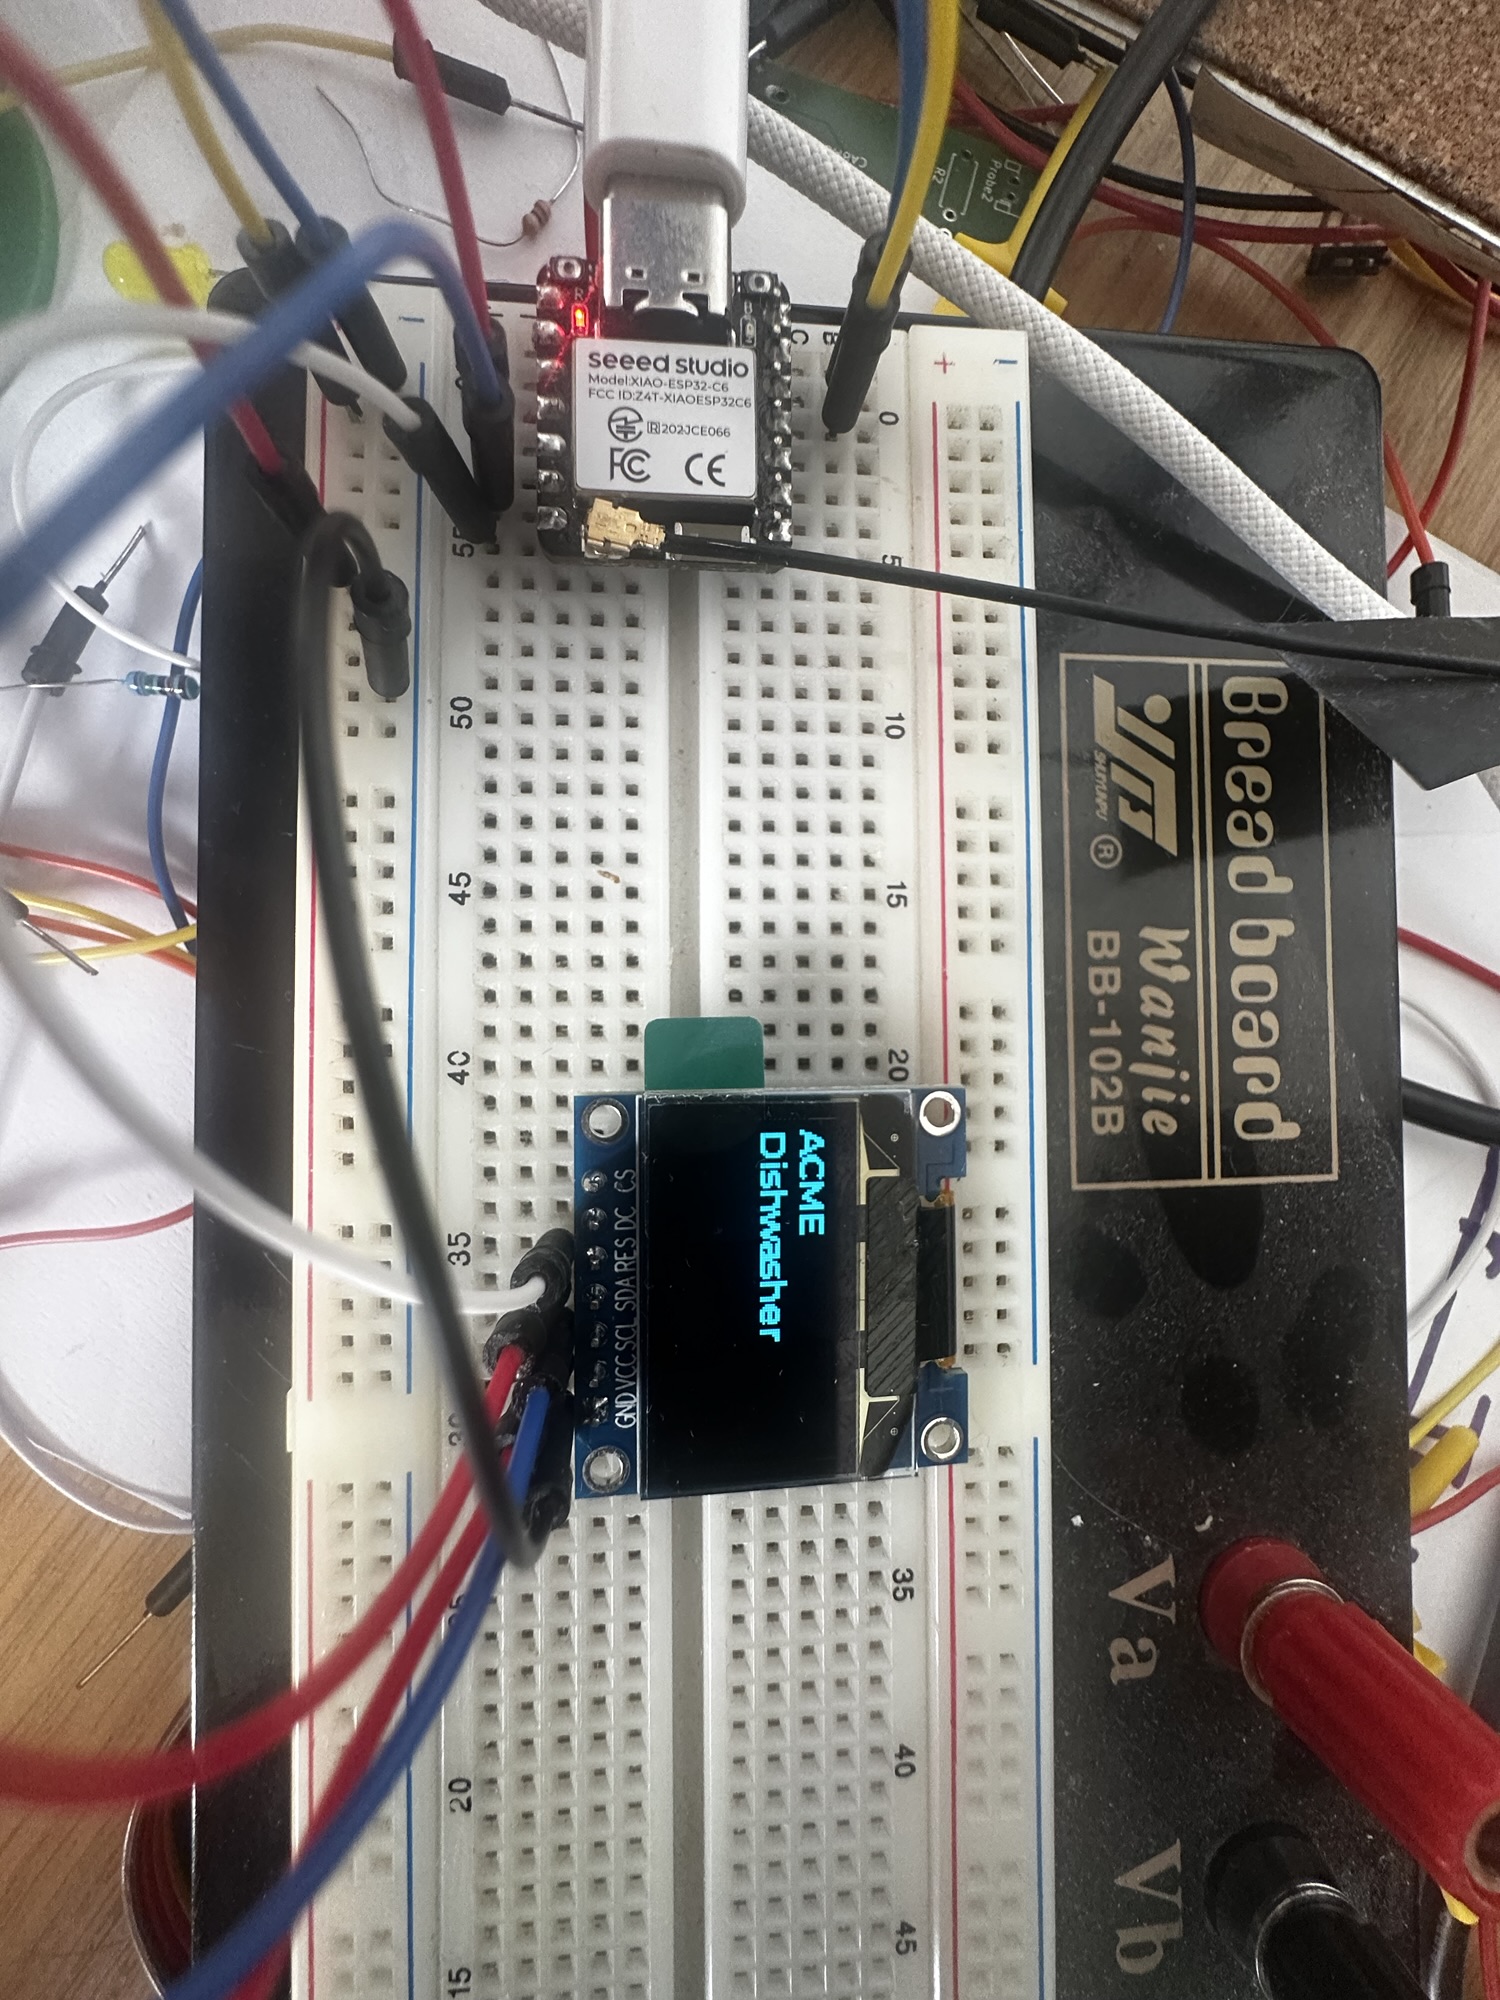
I then updated the StatusDisplayMgr to display the value of the OperationalState and the SelectedMode. The OperationalState was easy, but I had to work to get the SelectedMode from a uint8_t to the actual string.
char *mode = "Normal";char buffer[64];DishwasherModeDelegate *delegate = (DishwasherModeDelegate *)DishwasherMode::GetDelegate();if(delegate != nullptr) { MutableCharSpan label(buffer); delegate->GetModeLabelByIndex(mMode, label); mode = buffer; }
I then refactored the StatusDisplay to just accept the end values. It created two labels and stored a pointer to them. This is all done using the LVGL library – https://lvgl.io/
mModeLabel = lv_label_create(scr);lv_label_set_text(mModeLabel, "");lv_obj_set_width(mModeLabel, mDisp->driver->hor_res);lv_obj_align(mModeLabel, LV_ALIGN_LEFT_MID, 0, 0);mStateLabel = lv_label_create(scr);lv_label_set_text(mStateLabel, "");lv_obj_set_width(mStateLabel, mDisp->driver->hor_res);lv_obj_align(mStateLabel, LV_ALIGN_BOTTOM_LEFT, 0, 0);lv_obj_set_style_bg_color(mStateLabel, lv_color_hex(0x000000), LV_PART_MAIN);lv_obj_set_style_bg_opa(mStateLabel, LV_OPA_COVER, LV_PART_MAIN);lv_obj_set_style_text_color(mStateLabel, lv_color_hex(0xffffff), LV_PART_MAIN);
The set_style functions let me fill the background, so I get a nice effect.
Then came the moment of truth – using the rotary encoder to change the Selected Mode
The I2C driver proved to be very unreliable. I had to follow this in an effort to make it more reliable – https://esp32.com/viewtopic.php?t=45303. It helped, but after a while, the board seems to freeze and become unresponsive.
Not mush I could really do at this point, so I kept going.
Some buttons!
I now had the beginnings of a control system. I had a way to select a program Mode, but no way to start the the program. I also really needed an On/Off switch too. Maybe that was the place to start!
To make this work, ESP provides an iot-button component, which provides some nice functionality. I used it extensively when adding dimming to the esp-matter light_switch example.
On GPIO 0, I set up a button with long press
button_config_t config;memset(&config, 0, sizeof(button_config_t));config.type = BUTTON_TYPE_GPIO;config.gpio_button_config.gpio_num = GPIO_NUM_0;config.gpio_button_config.active_level = 1;button_handle_t handle = iot_button_create(&config);ESP_ERROR_CHECK(iot_button_register_cb(handle, BUTTON_LONG_PRESS_START, app_driver_button_long_press_start_cb, NULL));
In the callback method, it invokes a Toggle on the DishwasherManager
static void app_driver_button_long_press_start_cb(void *arg, void *data){ ESP_LOGI(TAG, "Long Press Started"); DishwasherMgr().TogglePower();}
With this working, it was time to connect it to the OnOff Attribute too. In TogglePower
void DishwasherManager::TogglePower(){ mIsPoweredOn = !mIsPoweredOn; ESP_LOGI(TAG, "Power is %s", mIsPoweredOn ? "on" : "off"); uint16_t endpoint_id = 0x01; uint32_t cluster_id = OnOff::Id; uint32_t attribute_id = OnOff::Attributes::OnOff::Id; esp_matter::attribute_t *attribute = esp_matter::attribute::get(endpoint_id, cluster_id, attribute_id); esp_matter_attr_val_t val = esp_matter_invalid(NULL); esp_matter::attribute::get_val(attribute, &val); val.val.b = mIsPoweredOn; esp_matter::attribute::update(endpoint_id, cluster_id, attribute_id, &val); UpdateDishwasherDisplay();}
The OnOff Attribute is set to the value of mIsPoweredOn.
If we want to react to changes to the attribute from outside, i.e. chip-tool, we can handle this too. When we setup the Root Endpoint, we call this
node_t *node = node::create(&node_config, app_attribute_update_cb, app_identification_cb);
The app_attribute_update_cb callback is where we can react to changes.
if (type == POST_UPDATE){ if (endpoint_id == 0x01) { if (cluster_id == OnOff::Id) { if (attribute_id == OnOff::Attributes::OnOff::Id) { ESP_LOGI(TAG, "OnOff attribute updated to: %s!", val->val.b ? "on" : "off"); if(val->val.b) { DishwasherMgr().TurnOnPower(); } else { DishwasherMgr().TurnOffPower(); } } } }}
POST_UPDATE means the esp-matter SDK has saved the value to persistent storage and I then call the right method on DishwasherMgr to turn it on or off!
That was power on & off taken care of.
Next button required was the one to start the selected “Program”.
I added this in like the on/off button
button_config_t start_config;memset(&start_config, 0, sizeof(button_config_t));start_config.type = BUTTON_TYPE_GPIO;start_config.gpio_button_config.gpio_num = GPIO_NUM_1;start_config.gpio_button_config.active_level = 1;button_handle_t start_handle = iot_button_create(&start_config);ESP_ERROR_CHECK(iot_button_register_cb(start_handle, BUTTON_LONG_PRESS_START, app_driver_start_button_long_press_start_cb, NULL));
The callback looked like this, calling a ToggleProgram function on the DishwasherMgr()
static void app_driver_start_button_long_press_start_cb(void *arg, void *data){ ESP_LOGI(TAG, "Start Long Press Started"); DishwasherMgr().ToggleProgram();}
The goal of ToggleProgram was to start the program is the Dishwasher was currently stopped and to pause it if it was currently running. Starting it set mTimeRemaining to 30 to represent 30 seconds.
void DishwasherManager::ToggleProgram(){ if (mState == OperationalStateEnum::kStopped) { xTaskCreate(ProgramTick, "NAME", 4096, NULL, 10, &xHandle); mTimeRemaining = 30; // TODO Make this depend on the selected mode. UpdateOperationState(OperationalStateEnum::kRunning); } else if (mState == OperationalStateEnum::kRunning) { vTaskSuspend(xHandle); }}
ProgramTick then just called a method on the Dishwasher every second whilst it was running.
static void ProgramTick(void *arg){ // Different Modes can have different times! // for (;;) { ESP_LOGI(TAG, "RunProgramTick"); OperationalStateEnum state = DishwasherMgr().GetOperationalState(); if (state == OperationalStateEnum::kRunning) { DishwasherMgr().MoveProgramAlongOneTick(); } vTaskDelay(1000 / portTICK_PERIOD_MS); }}void DishwasherManager::MoveProgramAlongOneTick(){ mTimeRemaining--; if (mTimeRemaining <= 0) { EndProgram(); }}
Once mTimeRemaining hit zero, EndProgram would be called, which pushed the device into Stopped state.
The mTimeRemaining value gets exposed by the GetCountdownTime method on the OperationalStateDelegate.

This attribute is optional, so we need to add it in, before it’s accessible.
esp_matter::cluster::operational_state::attribute::create_countdown_time(operational_state_cluster, 0);
I then query it using
chip-tool operationalstate read countdown-time 0x05 0x01
and that returns this

I then updated the delegate method to get the value from the DishwasherMgr()
DataModel::Nullable<uint32_t> OperationalStateDelegate::GetCountdownTime(){ return DataModel::MakeNullable(DishwasherMgr().GetTimeRemaining());}
Starting the cycle and reading the countdown-time now yielded the expected value

ESP32 Watchdog isn’t happy
Whilst all this functionality was great, I started having issues related to the LVGL library 😦 Sometimes, I would get this error, where the panel wouldn’t refresh.
E (9320) i2c.master: I2C hardware NACK detectedE (9320) i2c.master: I2C transaction unexpected nack detectedE (9320) i2c.master: s_i2c_synchronous_transaction(924): I2C transaction failedE (9340) i2c.master: i2c_master_multi_buffer_transmit(1186): I2C transaction failedE (9350) lcd_panel.io.i2c: panel_io_i2c_tx_buffer(193): i2c transaction failedE (9360) lcd_panel.ssd1306: panel_ssd1306_draw_bitmap(196): io tx param SSD1306_CMD_SET_COLUMN_RANGE failed
More seriously though, I was getting errors related to the IDLE Watchdog. These were more serious as they stopped the application in its tracks! Once this error appeared, the whole thing got stuck.

This means something is gobbling up all the CPU time. And from what I can tell, it’s the LVGL task! If I remove the code that updates the three lines on the display, it works without issue.
I couldn’t help but wonder if this flakiness was related to my soldering?
After some digging, I found that the problem was inside the lvgl library, where there appeared to be a stuck while-loop.

This lined up with the watchdog’s complaint. If flushing was always true, we’d be stuck in this loop forever and nothing else could run, triggering the watchdog. First step was ensuring I was up-to-date with the code as this could be a fixed bug. I was way behind!

I copied this from an Espressif’s example, which was clearly out of date, so I updated lvgl to 9.3 and esp_lvgl_port to 2.6.
After some tweaks to the code to fix compilation errors, I was truly delighted to find I had made things worse.

At this point, I decided to just try the example from ESP (esp-idf/examples/peripherals/lcd/i2c_oled) but it suffered exactly the same problem. My mind returned to the hardware being at fault, but since I had seen it work, it was something transient.
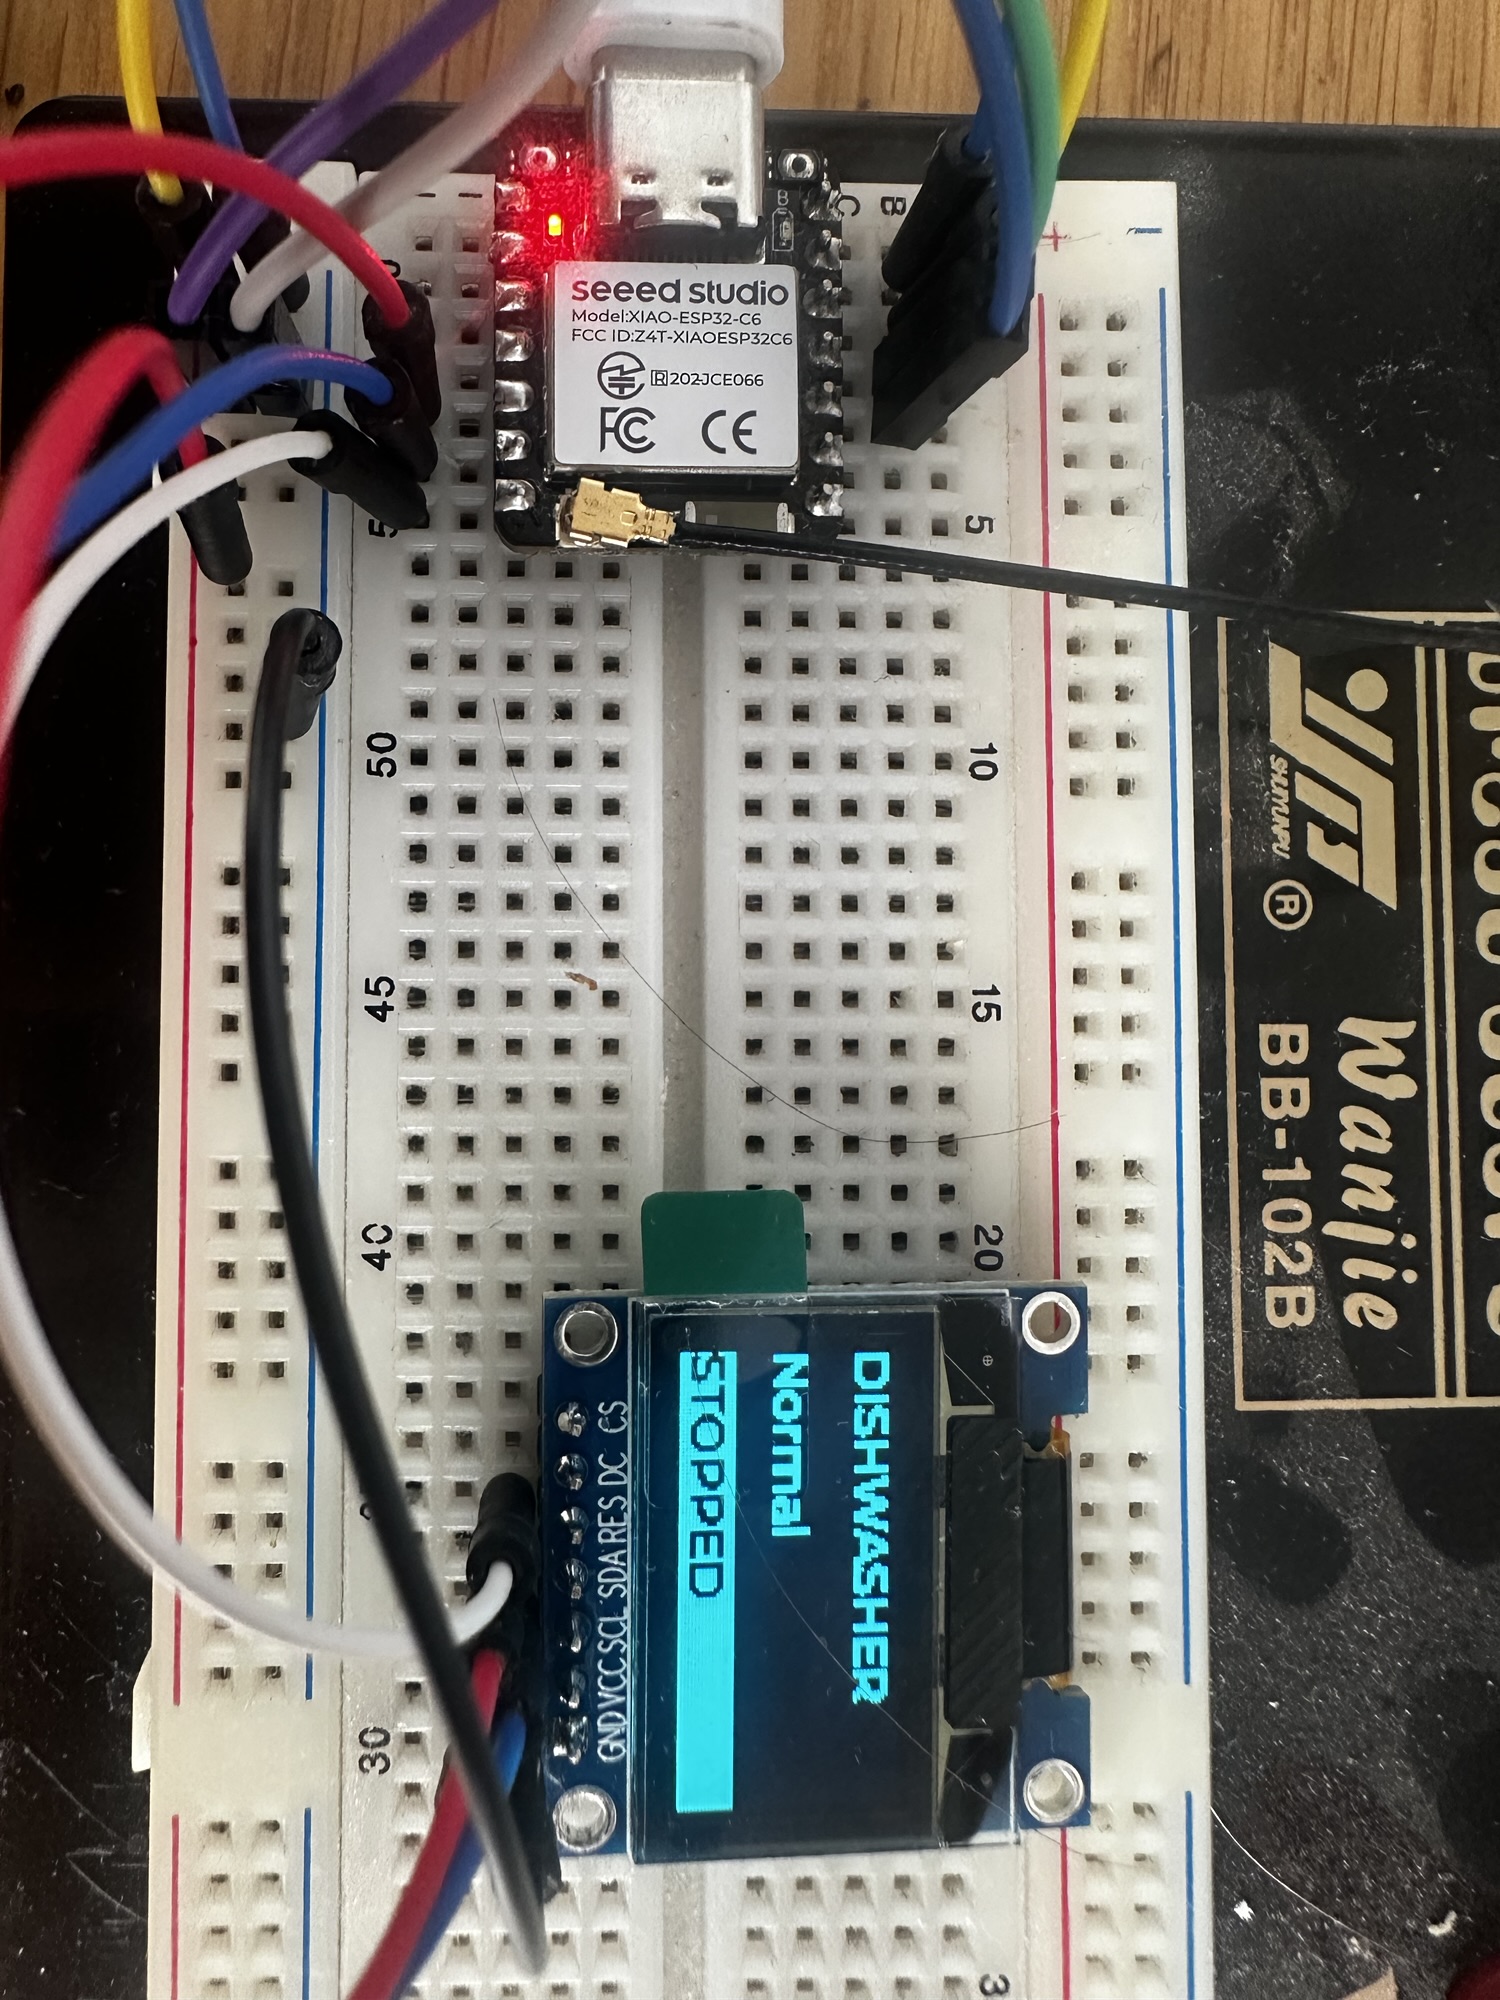
After must exploration and reading the answer was so simple. I just needed to ground the DC and CS pins on the display. FML
After some tinkering, I got my original code up and running!
Next Steps
Crikey, that’s a long blog post!
All the code is up at https://github.com/tomasmcguinness/matter-esp32-acme-dishwasher if you want to have a go yourself.
I’ll clean up some of the logic in the code and get the kids to help me make a simple enclosure for this. I also want to add a door open sensor, to complete the effect.
With this working, I’ll be returning to my .Net Matter Controller project now in an effort to figure out subscriptions and bindings. Then I want to look at Energy Management!
Did you like reading this post?
If you found this blog post useful and want to say thanks, you’re welcome to buy me a coffee. Better yet, why not subscribe to my Patreon so I can continue making tinkering and sharing.
Be sure to check out my YouTube Channel too – https://youtube.com/tomasmcguinness
Thanks,
Tom!

Leave a reply to Matter – Toy Dishwasher – Adding Phases – @tomasmcguinness Cancel reply