
Below is a photo of a Waveshare ESP32-S3-ETH DevKit.
In this blog post, I’m going to look at what’s involved in connecting this board to my local network using the ESP-IDF SDK.
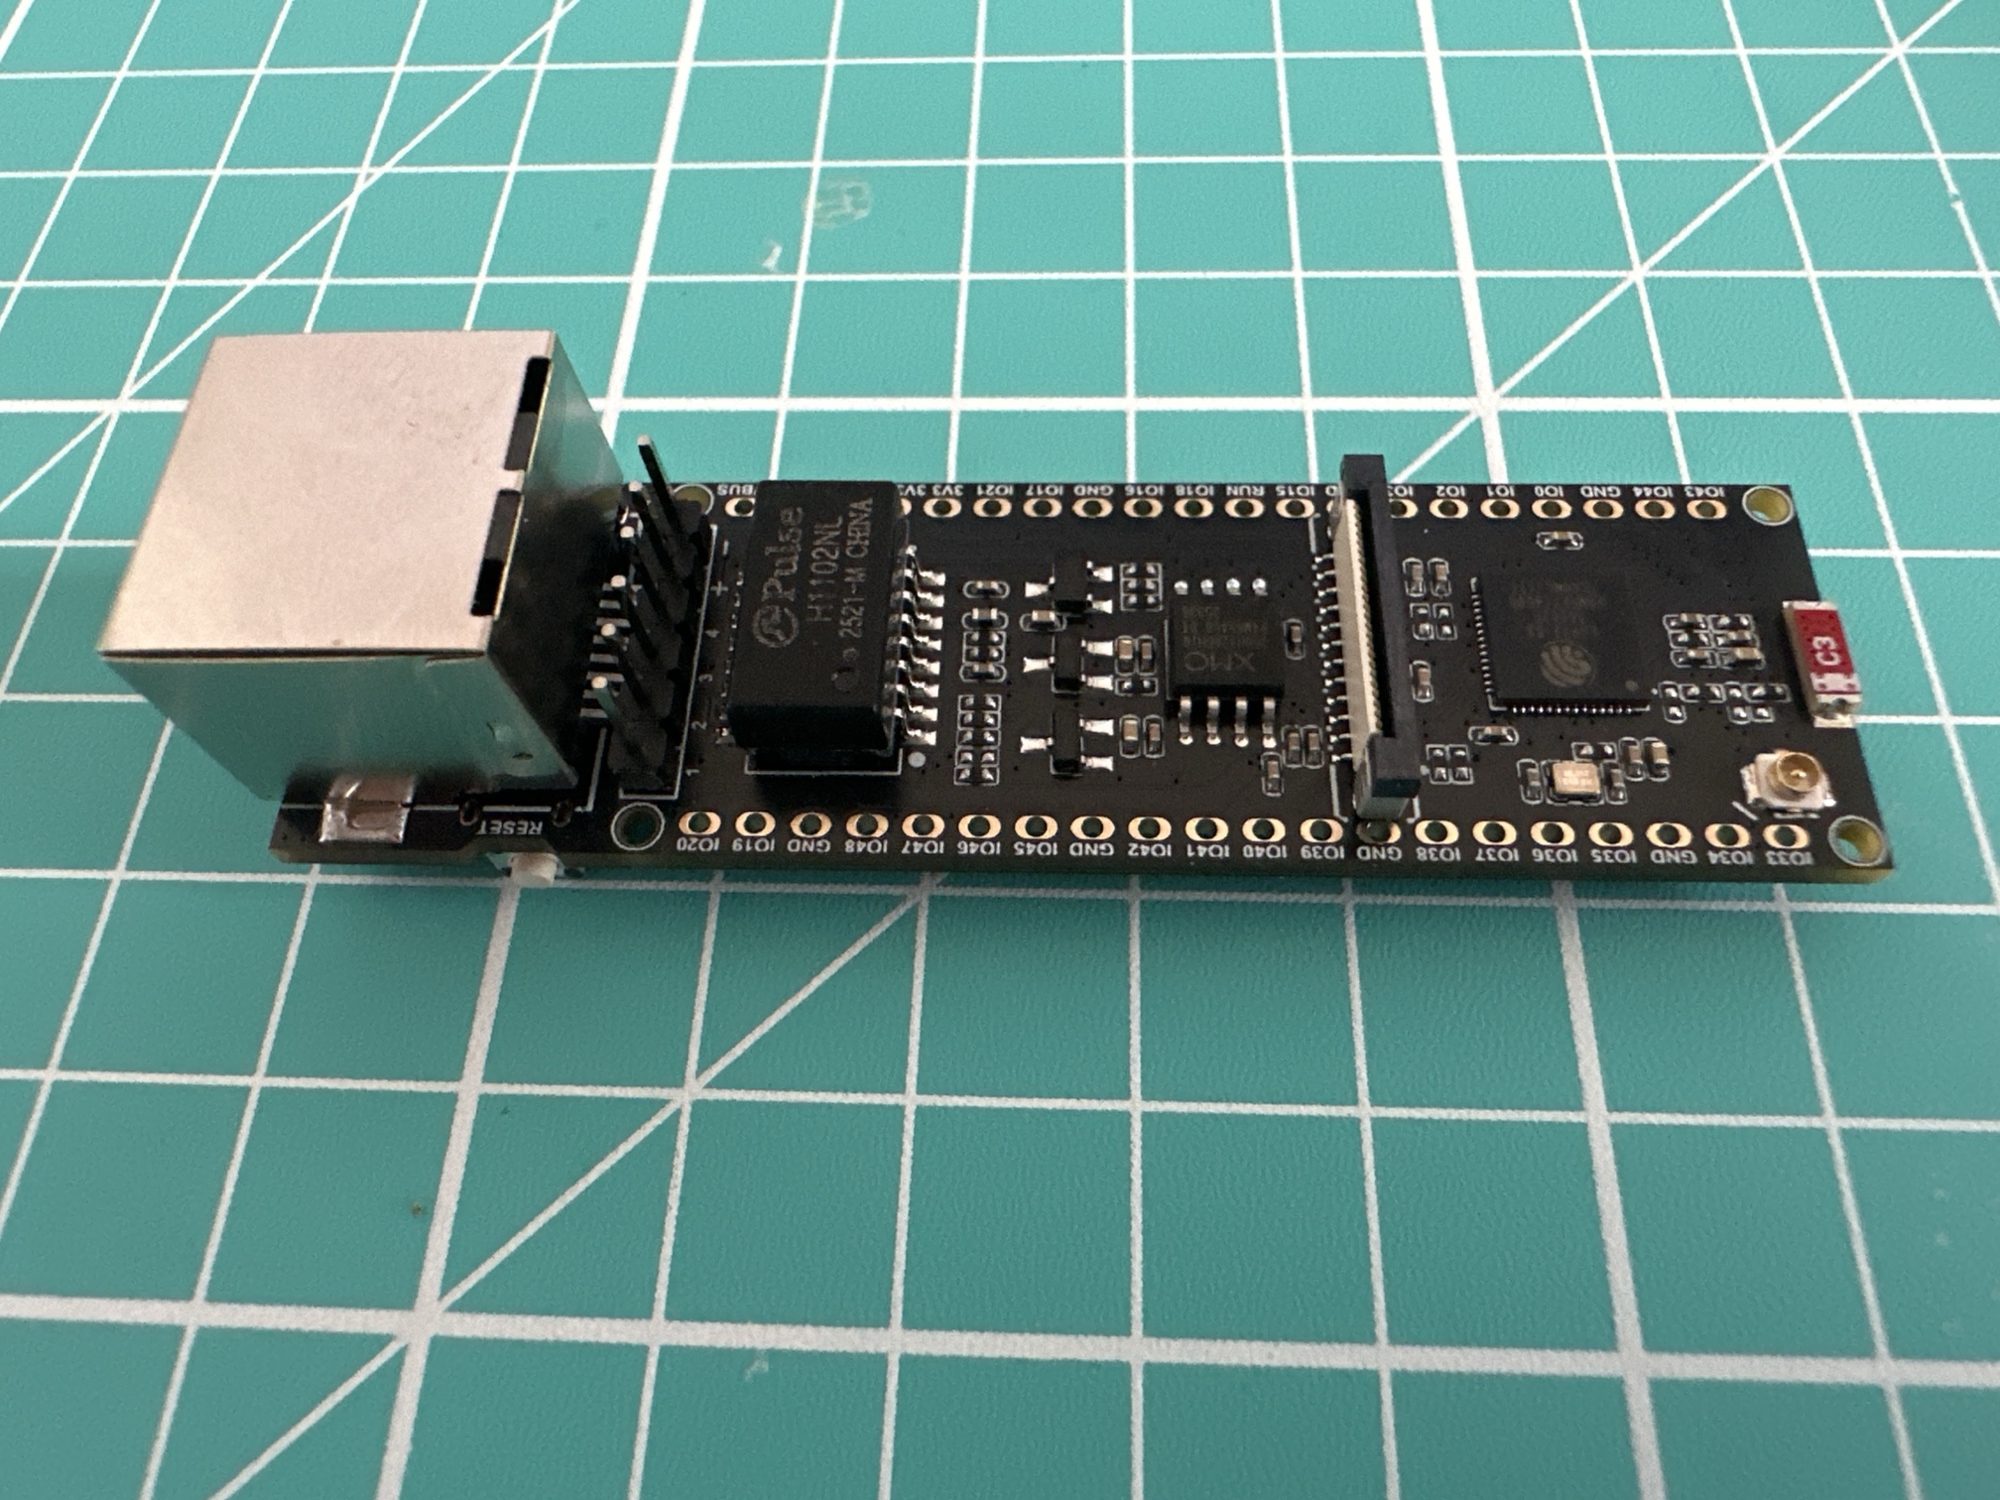
As the name suggests, it features an ESP32-S3 and an Ethernet RJ45 connector. It also has a camera connector, a MicroSD slot and the ability to support PoE (with an additional board).
Here is an Amazon link to the board – https://amzn.to/4cb2DdJ – this is an affiliate link, so I’ll earn a small percentage if you make a purchase.
The W5500
The ESP32-S3 doesn’t have any native Ethernet support built-in, so this DevKit has a W5500 chip. This chip contains a full Ethernet IP stack and does all the hard work. To talk to the W5500, we will use SPI (Serial Peripheral Interface). Thankfully, all of the support for the W5500 is available in the SDK already. We need only turn it on and configure it.
Turning it on, requires two settings
CONFIG_ETH_USE_SPI_ETHERNET=yCONFIG_ETH_SPI_ETHERNET_W5500=y
Once enabled, we need to identify which GPIOs are required for SPI. These are available on the Waveshare website
https://www.waveshare.com/wiki/ESP32-S3-ETH
You’ll find the pins listed under the ETH_DHCP section. These are all the GPIOs we need.
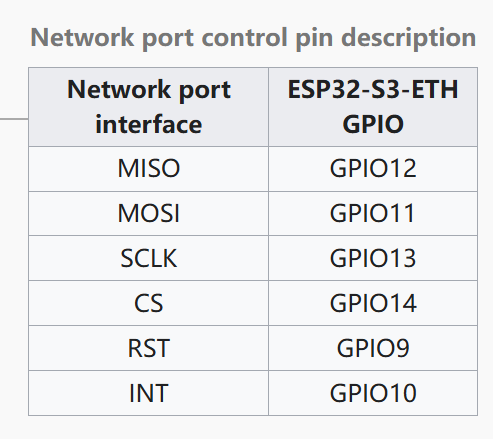
We can pop this into a set of configuration values
#define ETH_SPI_HOST SPI2_HOST#define ETH_SPI_SCLK_GPIO 13#define ETH_SPI_MOSI_GPIO 11#define ETH_SPI_MISO_GPIO 12#define ETH_SPI_CS_GPIO 14#define ETH_SPI_INT_GPIO 10#define ETH_SPI_RST_GPIO 9#define ETH_SPI_CLOCK_MHZ 25
Next, we need to setup and start the W5500 driver.
static esp_eth_handle_t s_eth_handle = NULL;static esp_eth_mac_t *s_mac = NULL;static esp_eth_phy_t *s_phy = NULL;static esp_eth_netif_glue_handle_t s_eth_glue = NULL;static esp_netif_t *eth_start(void){ gpio_install_isr_service(0); ESP_ERROR_CHECK(esp_netif_init()); ESP_ERROR_CHECK(esp_event_loop_create_default()); esp_netif_config_t netif_config = ESP_NETIF_DEFAULT_ETH(); esp_netif_t *eth_netif = esp_netif_new(&netif_config); spi_bus_config_t buscfg = { .miso_io_num = ETH_SPI_MISO_GPIO, .mosi_io_num = ETH_SPI_MOSI_GPIO, .sclk_io_num = ETH_SPI_SCLK_GPIO, .quadwp_io_num = -1, .quadhd_io_num = -1, }; ESP_ERROR_CHECK(spi_bus_initialize(ETH_SPI_HOST, &buscfg, SPI_DMA_CH_AUTO)); spi_device_interface_config_t spi_devcfg = { .mode = 0, .clock_speed_hz = ETH_SPI_CLOCK_MHZ * 1000 * 1000, .spics_io_num = ETH_SPI_CS_GPIO, .queue_size = 20 }; eth_w5500_config_t w5500_config = ETH_W5500_DEFAULT_CONFIG(ETH_SPI_HOST, &spi_devcfg); w5500_config.int_gpio_num = ETH_SPI_INT_GPIO; eth_mac_config_t mac_config = ETH_MAC_DEFAULT_CONFIG(); s_mac = esp_eth_mac_new_w5500(&w5500_config, &mac_config); eth_phy_config_t phy_config = ETH_PHY_DEFAULT_CONFIG(); phy_config.reset_gpio_num = ETH_SPI_RST_GPIO; s_phy = esp_eth_phy_new_w5500(&phy_config); esp_eth_config_t config = ETH_DEFAULT_CONFIG(s_mac, s_phy); ESP_ERROR_CHECK(esp_eth_driver_install(&config, &s_eth_handle)); uint8_t eth_mac[6] = {0}; ESP_ERROR_CHECK(esp_read_mac(eth_mac, ESP_MAC_ETH)); ESP_ERROR_CHECK(esp_eth_ioctl(s_eth_handle, ETH_CMD_S_MAC_ADDR, eth_mac)); s_eth_glue = esp_eth_new_netif_glue(s_eth_handle); esp_netif_attach(eth_netif, s_eth_glue); ESP_ERROR_CHECK(esp_event_handler_register(IP_EVENT, IP_EVENT_ETH_GOT_IP, &on_ip_event, NULL)); ESP_ERROR_CHECK(esp_event_handler_register(ETH_EVENT, ESP_EVENT_ANY_ID, &on_eth_event, eth_netif)); esp_eth_start(s_eth_handle); return eth_netif; }
Let’s break this down.
First, we need to setup netif, which is short for network interface. This essentially connects the hardware to the networking stack handling things like IP addresses.
gpio_install_isr_service(0);ESP_ERROR_CHECK(esp_netif_init()); ESP_ERROR_CHECK(esp_event_loop_create_default()); esp_netif_config_t netif_config = ESP_NETIF_DEFAULT_ETH(); esp_netif_t *eth_netif = esp_netif_new(&netif_config);
Next, we set up the SPI. This will use the GPIO values we configured earlier.
spi_bus_config_t buscfg = { .miso_io_num = ETH_SPI_MISO_GPIO, .mosi_io_num = ETH_SPI_MOSI_GPIO, .sclk_io_num = ETH_SPI_SCLK_GPIO, .quadwp_io_num = -1, .quadhd_io_num = -1,};ESP_ERROR_CHECK(spi_bus_initialize(ETH_SPI_HOST, &buscfg, SPI_DMA_CH_AUTO));spi_device_interface_config_t spi_devcfg = { .mode = 0, .clock_speed_hz = ETH_SPI_CLOCK_MHZ * 1000 * 1000, .spics_io_num = ETH_SPI_CS_GPIO, .queue_size = 20};
Then we create the MAC and PHY layers. These I don’t really understand, but they represent the Media Access Control (MAC) and PHYsical layers of the networking stack. The W5500 contains the full TCP/IP stack, so I think this wires everything up over SPI.
eth_w5500_config_t w5500_config = ETH_W5500_DEFAULT_CONFIG(ETH_SPI_HOST, &spi_devcfg);w5500_config.int_gpio_num = ETH_SPI_INT_GPIO;eth_mac_config_t mac_config = ETH_MAC_DEFAULT_CONFIG(); s_mac = esp_eth_mac_new_w5500(&w5500_config, &mac_config);eth_phy_config_t phy_config = ETH_PHY_DEFAULT_CONFIG(); phy_config.reset_gpio_num = ETH_SPI_RST_GPIO;s_phy = esp_eth_phy_new_w5500(&phy_config);
Lastly, we initialise the driver itself and glue the MAC, PHY and NETIF parts together.
esp_eth_config_t config = ETH_DEFAULT_CONFIG(s_mac, s_phy);ESP_ERROR_CHECK(esp_eth_driver_install(&config, &s_eth_handle));uint8_t eth_mac[6] = {0};ESP_ERROR_CHECK(esp_read_mac(eth_mac, ESP_MAC_ETH));ESP_ERROR_CHECK(esp_eth_ioctl(s_eth_handle, ETH_CMD_S_MAC_ADDR, eth_mac));s_eth_glue = esp_eth_new_netif_glue(s_eth_handle);esp_netif_attach(eth_netif, s_eth_glue);
Handling Events
Before we start the Ethernet networking, we want to subscribe to some events. These events will inform us of when we have things like an ethernet cable being plugged in. We register for both IP_EVENTs and ESP_EVENTs.
esp_event_handler_register(ETH_EVENT, ESP_EVENT_ANY_ID, &on_eth_event, eth_netif);esp_event_handler_register(IP_EVENT, IP_EVENT_ETH_GOT_IP, &on_ip_event, NULL);esp_event_handler_register(IP_EVENT, IP_EVENT_GOT_IP6, &on_ipv6_event, NULL);
The ESP_EVENT_ANY_ID sends all high level events to on_eth_event. In this post, I’m just logging the events, but in reality your code would respond accordingly.
static void on_eth_event(void *esp_netif, esp_event_base_t event_base, int32_t event_id, void *event_data){ switch (event_id) { case ETHERNET_EVENT_CONNECTED: ESP_LOGI(TAG, "Ethernet link up"); break; case ETHERNET_EVENT_DISCONNECTED: ESP_LOGI(TAG, "Ethernet link down"); break; case ETHERNET_EVENT_START: ESP_LOGI(TAG, "Ethernet started"); break; case ETHERNET_EVENT_STOP: ESP_LOGI(TAG, "Ethernet stopped"); break; }}
The IP_EVENT handlers just log the acquisition of an IP address. In this case, IP and IPv6
static void on_ip_event(void *arg, esp_event_base_t event_base, int32_t event_id, void *event_data){ ip_event_got_ip_t *event = (ip_event_got_ip_t *)event_data; ESP_LOGI(TAG, "Got IP: " IPSTR, IP2STR(&event->ip_info.ip));}static void on_ipv6_event(void *arg, esp_event_base_t event_base, int32_t event_id, void *event_data){ ip_event_got_ip6_t *event = (ip_event_got_ip6_t *)event_data; ESP_LOGI(TAG, "Got IPv6: " IPV6STR, IPV62STR(event->ip6_info.ip));}
Again, in an actual application, you might use this event to start a web server or something similar.
Testing it
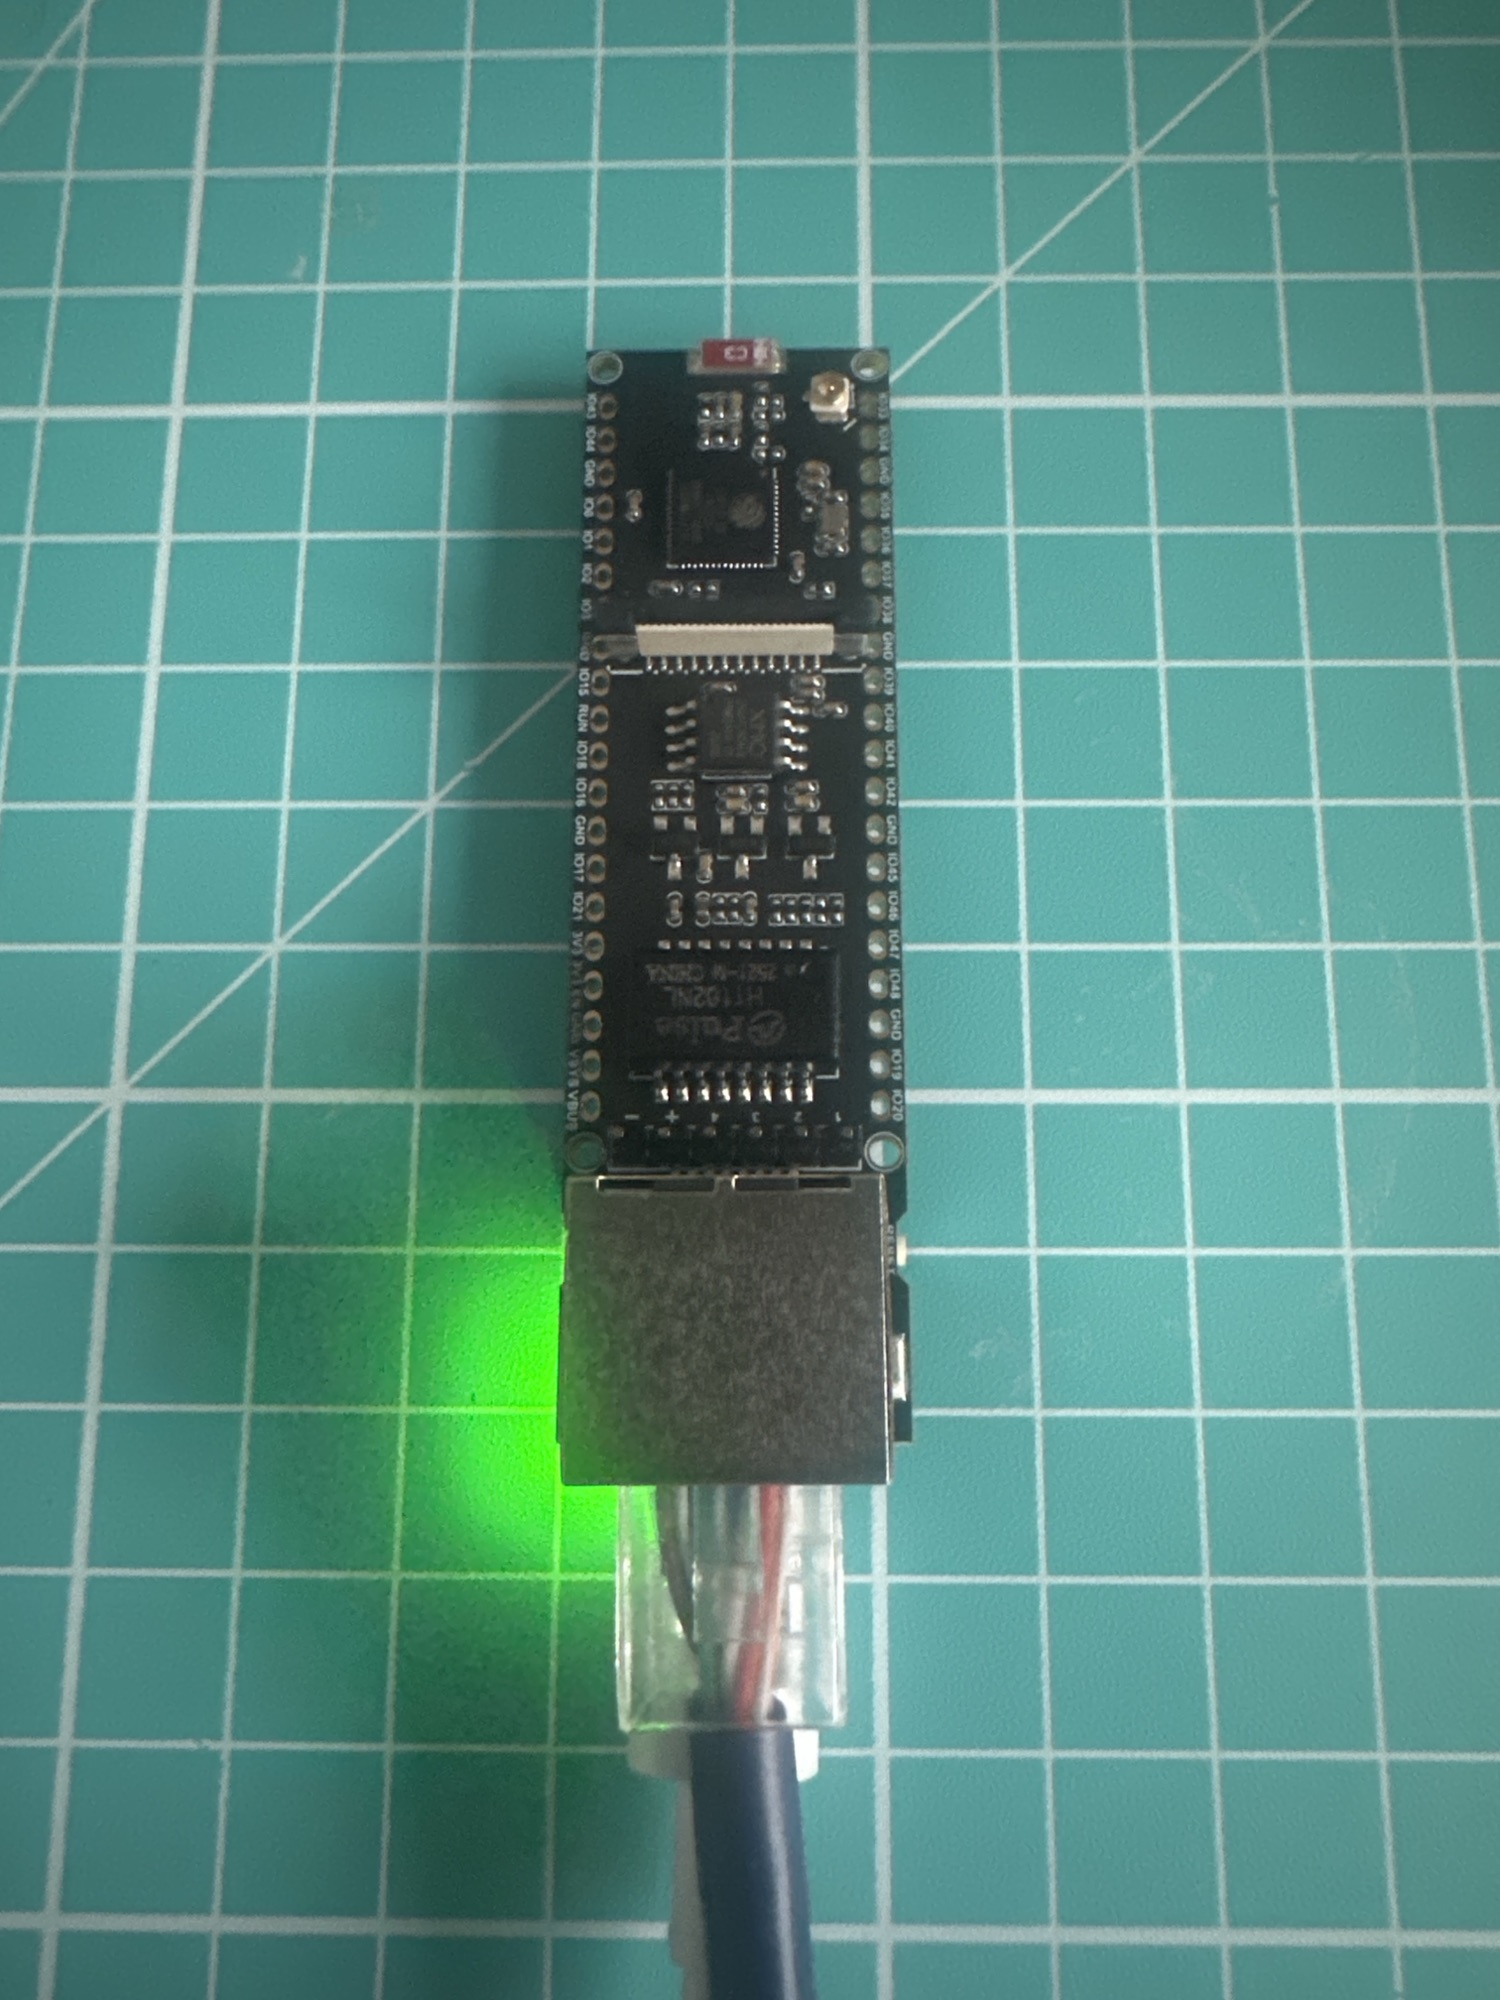
Once the code is flashed onto the board, we just need to connect an Ethernet cable to it (onc connected to a network of course 😛)
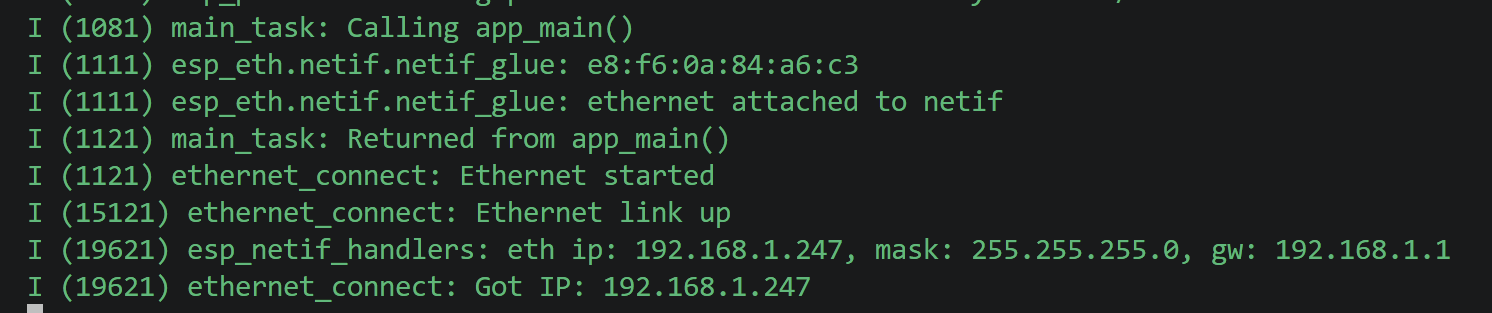
Looking at the output, we can see when I connected the ethernet cable and after a few seconds, I get an IP Address!
Where is IPv6?
Being honest, I was surprised not to see the IPv6 handler firing. After a little digging into the examples, I found the cause. I needed to create the type of IPv6 link. This required adding esp_netif_create_ip6_linklocal to the ETHERNET_EVENT_CONNECTED handler.
case ETHERNET_EVENT_CONNECTED: ESP_LOGI(TAG, "Ethernet link up"); ESP_ERROR_CHECK(esp_netif_create_ip6_linklocal((esp_netif_t *)esp_netif)); break;
With that in play, I got an IPv6 when I flashed and restarted.

You can see there are two IPv6 addresses. As I understand it, the first one begins fe80, which is a link-local address (from esp_netif_create_ip6_linklocal). This is a self-assigned address. Once we have a link-local address, DHCP can then be used to get a *proper* IP address.
Summary
Getting the DevKit connected to my local network was much easier than I expected. I was so pleased to see that the ESP-IDF SDK has support for the W5500 chip baked into.
I am planning on using this DevKit as part of a Modbus project, but I can separate this out into a sample if anyone is interested.
The Modbus project can be found here – https://github.com/tomasmcguinness/matter-esp32-modbus-tcp-adapter
Did you enjoy this post?
If you found this blog post useful and want to say thanks, you’re welcome to buy me a coffee.
Be sure to check out my YouTube Channel too – https://youtube.com/tomasmcguinness
Thanks,
Tom!

Leave a comment