I’ve finally started making progress with my Matter based Energy Manager UI. With the help of Claude Code, I even had a nice animation, showing power flowing. I was getting a sense for the how it might all hang together.
My original goal was to use data from my Solax Inverter to provide details about the power flowing to and from the grid. However, as the rabbits in my head ran around their wheels, I realised that probably wasn’t the right approach at this stage.
Having real grid data is the ultimate goal, but at this early stage, I need to be able to test changing conditions. To accomplish this, I decided to build a dummy Electricity Meter on an ESP32. This would make much easier when debugging UI and ML as I could swing from importing to exporting, something that would be impossible otherwise (short of building a weather machine)
The first step was creating a Matter device to represent my electricity meter.
Meter Reference Point
With Matter 1.5, several new device types were introduced to describe Electricity Meters. The most basic of these is the Meter Reference Point. This is a Matter device type that provides details about tariffs and power.
There are quite a few different ways to use this Meter Reference Point, but as I’m interested in power & energy for my UI, this is the configuration I’d want.
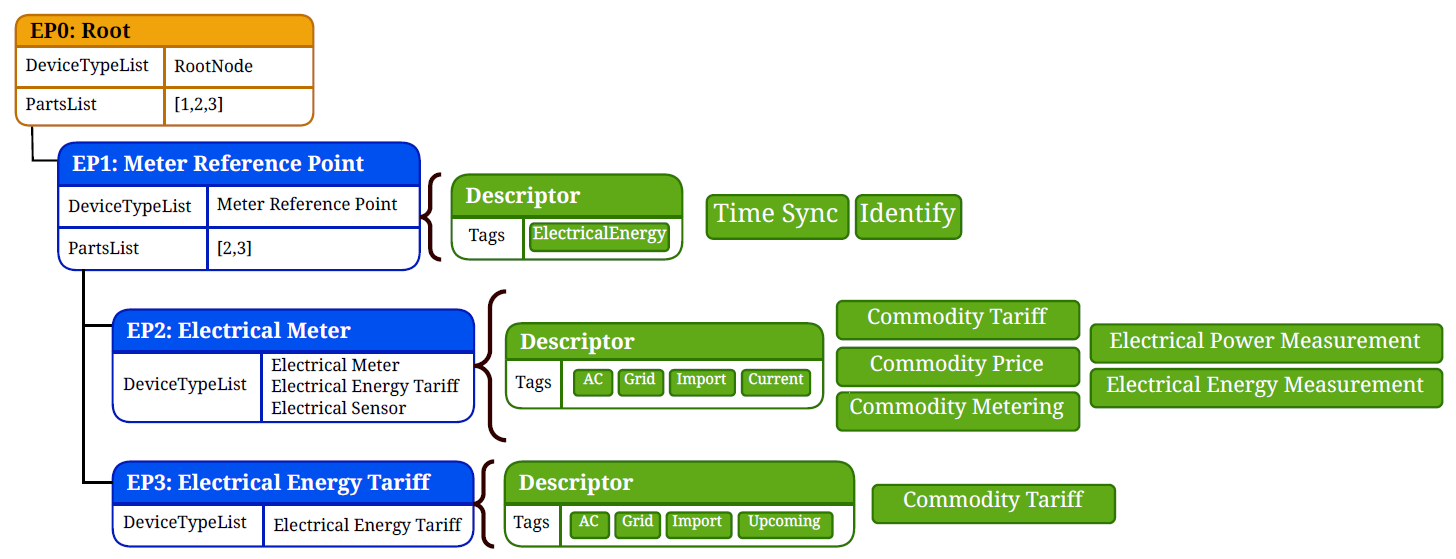
The metering part is a straight-forward Electrical Sensor, providing the Electrical Power Measurement and Electrical Energy Measurement clusters.
The Tariff part is much more interesting, but I don’t want to delve into it here. I have written a up a post on the Commodity Tariff cluster, which is worth a read.
Once I make more progress on the initial goals of my energy UI, I will swing back to Tariffs 😀 It would be really nice to see a current price indicator on the UI.
Building a Meter Reference Point
To build my own Meter Reference Point, I’m using the ESP-IDF and ESP-MATTER SDKs. To run it, I’ll be using a XIAO ESP32-C6 devkit.
To control the current and voltage readings, I’ll use two potentiometers. These will allow me to adjust the the values manually, within simple a rnage.
Multiplying current and voltage yields power, giving me the value I really need for my UI.
The plan was simple. Build up the basics of the Matter device and then expose the current, voltage and power values via the Electrical Power Measurement cluster. For simplicity, I would simply ignore the other clusters. I’m not going for any form of certification, so I have a lot of flexibility in what I implement!
I started with the most basic app_main possible. It declares a node and starts the Matter server.
extern "C" void app_main(){ nvs_flash_init(); esp_err_t err = factory_reset_button_register(); ABORT_APP_ON_FAILURE(ESP_OK == err, ESP_LOGE(TAG, "Failed to initialize reset button, err:%d", err)); node::config_t node_config; node_t *node = node::create(&node_config, app_attribute_update_cb, app_identification_cb); ABORT_APP_ON_FAILURE(node != nullptr, ESP_LOGE(TAG, "Failed to create Matter node")); err = esp_matter::start(app_event_cb); ABORT_APP_ON_FAILURE(err == ESP_OK, ESP_LOGE(TAG, "Failed to start Matter, err:%d", err));}
First, we need to add Endpoint 0x01, which is the Meter Reference Point
esp_matter::endpoint::meter_reference_point::config_t meter_reference_point_config; endpoint_t *meter_reference_point_endpoint = meter_reference_point::create(node, &meter_reference_point_config, ENDPOINT_FLAG_NONE, nullptr); ABORT_APP_ON_FAILURE(meter_reference_point_endpoint != nullptr, ESP_LOGE(TAG, "Failed to create meter reference point endpoint"));
I’m going to leave Identity on the root node and ignore TimeSync as I’m not 100% sure what that is right now (and I don’t want to get distracted!).
Next, I’ll declare the ElectricalEnergy tag
constexpr uint8_t kNamespaceElectricalMeasurement = 0x06;constexpr uint8_t kTagElectricalEnergy = 0x0E;static const Globals::Structs::SemanticTagStruct::Type kMeterRefPointTags[] = { {.mfgCode = chip::app::DataModel::NullNullable, .namespaceID = kNamespaceElectricalMeasurement, .tag = kTagElectricalEnergy},};
Before adding it to the endpoint
cluster_t *descriptor = cluster::get(meter_reference_point_endpoint, Descriptor::Id);descriptor::feature::tag_list::add(descriptor);endpoint::set_semantic_tags(meter_reference_point_endpoint, kMeterRefPointTags, 1);
To confirm these initial changes, I used the chip-tool to query the device. First, look at the device-type-list for endpoint 0x01

With this endpoint in place, we move onto the Endpoint 0x02, starting with the Electrical Meter.
electrical_meter::config meter_config;meter_config.electrical_power_measurement.feature_flags |= electrical_power_measurement::feature::alternating_current::get_id();meter_config.electrical_energy_measurement.feature_flags |= electrical_energy_measurement::feature::imported_energy::get_id();meter_config.electrical_energy_measurement.feature_flags |= electrical_energy_measurement::feature::cumulative_energy::get_id();endpoint_t *electrical_meter_endpoint = electrical_meter::create(node, &meter_config, ENDPOINT_FLAG_NONE, nullptr);ABORT_APP_ON_FAILURE(electrical_meter_endpoint != nullptr, ESP_LOGE(TAG, "Failed to create electrical meter endpoint"));
This device includes three clusters
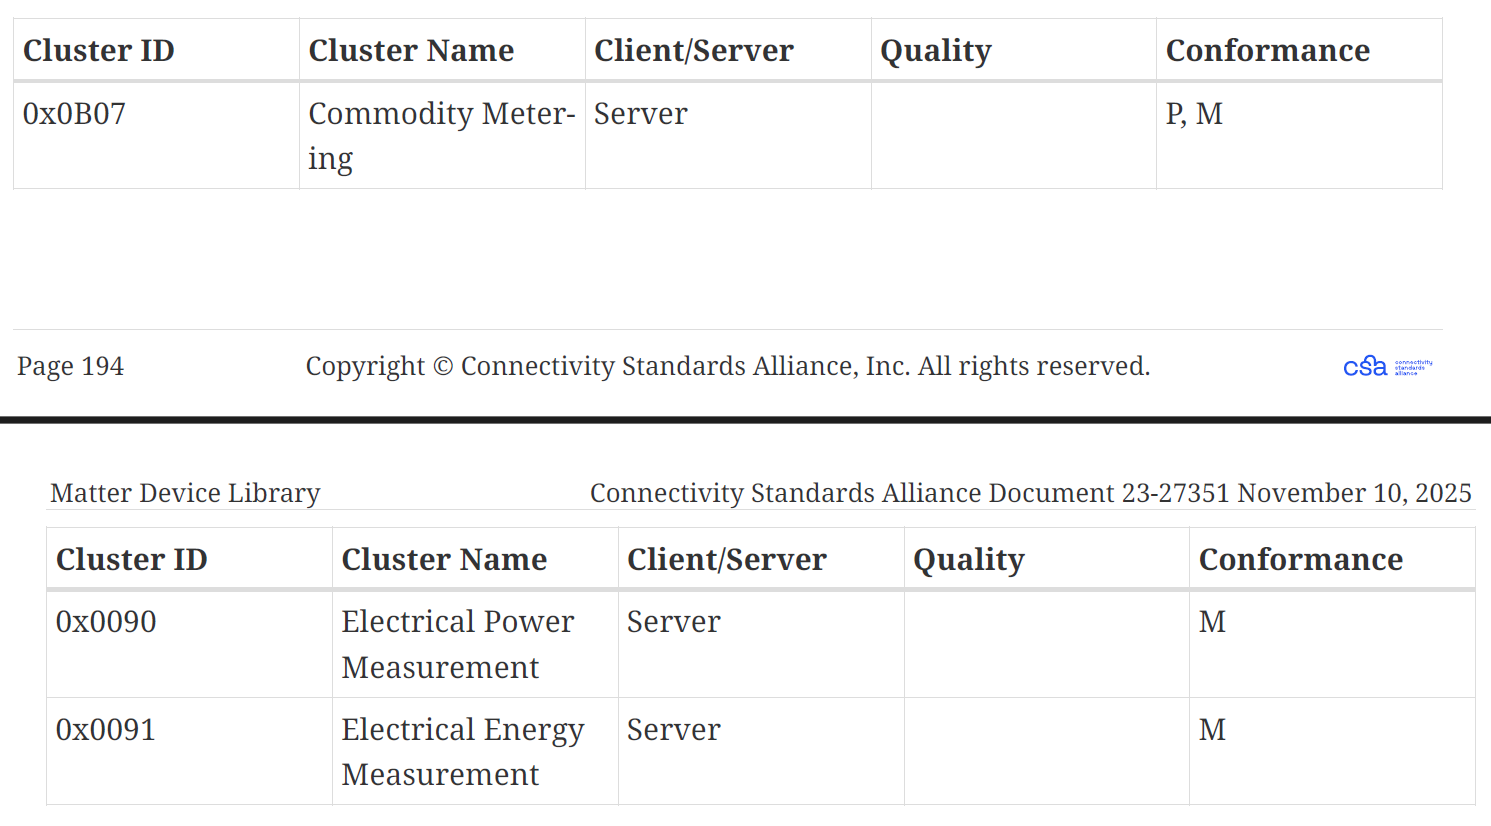
I’m going to skip Commodity Metering for now. This Cluster is used to expose the actual meter readings that a real meter would make. The Meter Reference Point device says that these readings should be in kWh or kVAh by setting an element requirement.

As I’m the only one using this node, I’m going to just ignore this too.
If you recall the structure of endpoint 0x02, you’ll notice that it supports the Electrical Sensor device type too.
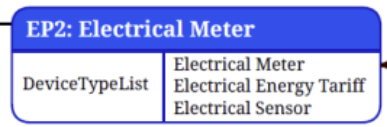
Because the Electrical Meter device type includes the Electrical Power Measurement and Electrical Energy Measurement clusters, we automatically conform to the Electrical Sensor device type too. One is a super set of the other. To reflect this, I need to manually add this device type to the endpoint.
err = add_device_type(electrical_meter_endpoint, electrical_sensor::get_device_type_id(), electrical_sensor::get_device_type_version());ABORT_APP_ON_FAILURE(err == ESP_OK, ESP_LOGE(TAG, "Failed to add device type"));
Finally, we want to make Endpoint 0x02 a child of Endpoint 0x01
endpoint::set_parent_endpoint(electrical_meter_endpoint, meter_reference_point_endpoint);
If I now query the parts-list of Endpoint 0x01, I’ll be told that there is one child and its Endpoint 0x02

Exposing the measurements
With my endpoints in place, I now needed to get some data into the Electrical Power Measurement cluster!
The Electrical Power Measurement cluster uses a delegate pattern to get its data. Rather than the values being stored directly in the attributes, they are retrieved using a delegate interface. For the Electrical Power Measurement, that delegate is
chip::app::Clusters::ElectricalPowerMeasurement::Delegate
To encapsulate it, I created a class
class ElectricalSensorDriver : public chip::app::Clusters::ElectricalPowerMeasurement::Delegate {
I declared three member variables to store the values I wanted, all initialized to 0.
chip::app::DataModel::Nullable<int64_t> m_voltage = 0;chip::app::DataModel::Nullable<int64_t> m_active_current = 0;chip::app::DataModel::Nullable<int64_t> m_active_power = 0;
I then implemented three of the Delegate methods to return current, voltage and power.
chip::app::DataModel::Nullable<int64_t> GetVoltage() override { return m_voltage; }chip::app::DataModel::Nullable<int64_t> GetActiveCurrent() override { return m_active_current; }chip::app::DataModel::Nullable<int64_t> GetActivePower() override { return m_active_power; }
Back in the app_main, I created a new instance of this class, making it static so it had a long lifetime.
static ElectricalSensorDriver gEPMDelegate; // static lifetime required
The last step was to assign the delegate to the cluster.
meter_config.electrical_power_measurement.delegate = &gEPMDelegate;
In the Electrical Power Measurement cluster, only the Active Power attribute is mandatory, so I added both Active Current and Voltage.
cluster_t *epm_cluster = cluster::get(electrical_meter_endpoint, ElectricalPowerMeasurement::Id);electrical_power_measurement::attribute::create_voltage(epm_cluster, nullable<int64_t>());electrical_power_measurement::attribute::create_active_current(epm_cluster, nullable<int64_t>());
The chip-tool returned the 0 value for Active Current when I queried it, exactly as expected!

Simulating Current, Voltage & Power
With the Matter Endpoints configured, it was time to add some code to “take readings”. I started with a function to represent a task
void ElectricalSensorDriver::reading_task(void *parameters)
This gets started by the function start_reading()
void ElectricalSensorDriver::start_reading(){ xTaskCreate(reading_task, "epm_reading", 4096, this, 5, nullptr);}
With the reading_task, there is a continuous loop, running once a second.
while (true) { vTaskDelay(pdMS_TO_TICKS(1000)); ...}
To start me off, I generate a slightly random voltage value between 246V and 250V. This is to simulate fluctuating voltage. I’m not sure it would move 4V every second, but this is just a simulator. I’m also careful to use mV for Matter.
int64_t voltage_mV = 246000 + (esp_random() % 21) * 100;
For current, I take an ADC reading and use that to produce a current reading. I just take the level reading, centre it around 2048 (giving me positive and negative) and multiple it by 100. So, at either end, I could have a current value swinging between -20 and +20 amps.
int raw = 0;adc_oneshot_read(driver->m_adc_handle, ADC_CHANNEL_0, &raw);int64_t current_mA = static_cast<int64_t>(raw - 2048) * 100;int64_t power_mW = (voltage_mV * current_mA) / 1'000;
Once I have my three values, I update them via the driver, which will trigger a Matter update.
auto *args = new std::tuple<ElectricalSensorDriver *, int64_t, int64_t,int64_t>(driver, voltage_mV, current_mA, power_mW);chip::DeviceLayer::PlatformMgr().ScheduleWork([](intptr_t arg) { auto *args = reinterpret_cast<std::tuple<ElectricalSensorDriver *, int64_t, int64_t,int64_t> *>(arg); ElectricalSensorDriver *driver = std::get<0>(*args); int64_t voltage_mV = std::get<1>(*args); int64_t current_mA = std::get<2>(*args); int64_t power_mW = std::get<3>(*args); driver->set_voltage(voltage_mV); driver->set_active_current(current_mA); driver->set_active_power(power_mW); delete args;}, reinterpret_cast<intptr_t>(args));
For example, set_voltage looks like this
void ElectricalSensorDriver::set_voltage(int64_t mV){ m_voltage.SetNonNull(mV); MatterReportingAttributeChangeCallback(mEndpointId, ElectricalPowerMeasurement::Id, Voltage::Id);}
It sets the internal member and then tells SDK that the Matter attribute has changed. This, in turn, triggers a read via the Clusters::ElectricalPowerMeasurement::Delegate, which users the m_voltage member.
Testing
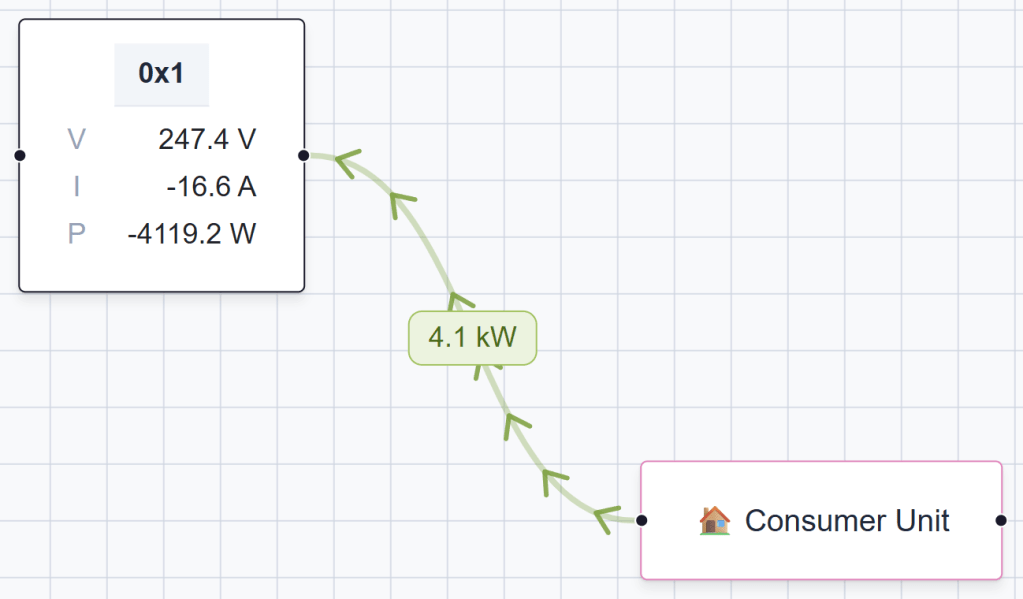
To see this device in action, I paired it with my HEMS application and dropped it on the canvas in the application. You can see the box titled “0x1”, representing Node 0x1 in my fabric, which is my Meter Reference Point device.
It shows the V, I and P values (That’s Voltage, Current and Power). The voltage is random, but the current is responding as I turn the potentiometer!
If I swing the pot all the way in the other direction, I see negative values.
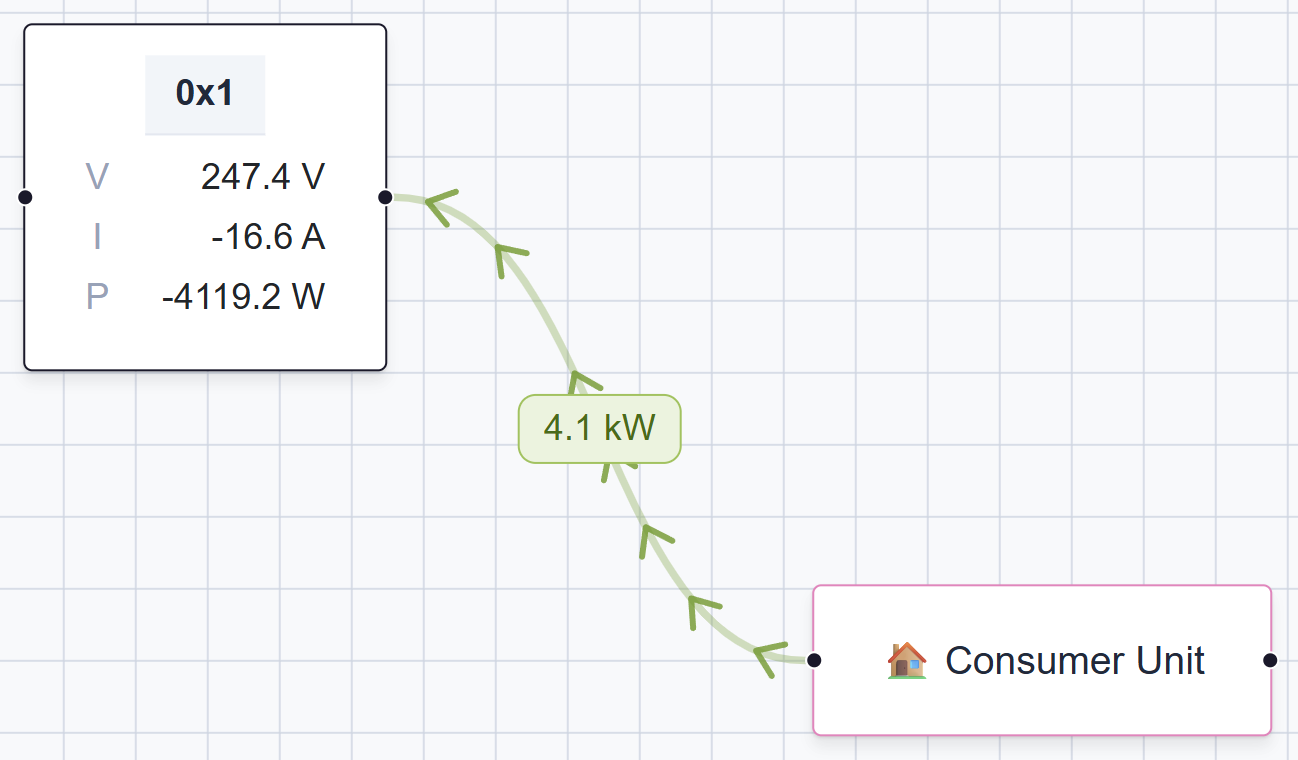
From an electrical standpoint, a negative current is correct when power is flowing out. My interpretation of positive and negative needs some work as the Matter has rules around this. I’m using Red for import and green for export. That feels right from a user’s perspective. Cleaning this up is a worry for another day.
What’s Next?
Ultimately, this is the end of the line for this particular project.
It was a useful learning exercise and it has been great for testing my UI and Matter subscription logic.
When I want to get *actual* power readings, I’ll use a Gen 4 Shelly EM to monitor voltage and current. These devices support Matter 1.4 and should slot into my Energy Manager without any fuss.
Beyond power measuring, I’d love to add support for the Electrical Energy Tariff and show price information. I think it would be useful to connect to Octopus Energy (my provider) and pull data from their API. It’s probably not the most practical idea, but it would be nice to explore. This would mean I’d use the same Meter Reference Point, but I’d have Commodity Tariff and Commodity Price clusters.
Summary
In this post, I showed how I implemented the Matter Meter Reference Point device type using esp-matter on a XIAO ESP32-C6.
If you want to follow along as I build out my Matter Energy Manager, be sure to subscribe so you don’t miss the next post.
Did you enjoy this post?
If you found this blog post useful and want to say thanks, you’re welcome to buy me a coffee. Better yet, why not subscribe to my Patreon so I can continue making, tinkering and sharing.
Be sure to check out my YouTube Channel too – https://youtube.com/tomasmcguinness
Thanks,
Tom!

Leave a comment